If you haven’t created a Facebook (Meta) lead ad campaign before, it can feel a little daunting. In this tutorial, I’ll walk you through how to create and run your first lead ad using Meta’s instant forms: in-app forms that open directly inside Facebook or Instagram with the person’s name and email already pre-filled. No landing page required.
Meta introduced lead ads back in 2015, and a decade on they’re still one of the cheapest ways to collect contact details at scale. The reach is hard to argue with: an average of 3.56 billion people used at least one Meta app every day in March 2026 (Meta Q1 2026 10-Q). Because the form is native to the app and pre-filled from the user’s profile, friction drops and conversion rates climb.
How to create Facebook lead ads in 8 steps: (1) Create a new campaign with the Leads objective, (2) Build your target audience, (3) Upload your ad image or video, (4) Write compelling ad copy with a clear call to action, (5) Create your lead form with your questions, privacy policy link, and thank-you screen, (6) Publish your campaign, (7) Access your leads by connecting LeadSync for instant delivery via email, CRM, or SMS, (8) Monitor your cost per lead against industry benchmarks. Full step-by-step guide with screenshots below.
I’m going to assume you already have a Facebook Business Page and an Ad Account set up for your business. If you’re not familiar with the format yet, start with how Facebook lead generation ads work.
Prefer to watch? Here’s the full walkthrough:
Where Do Meta Lead Ads Run, and Where Does the Form Live?
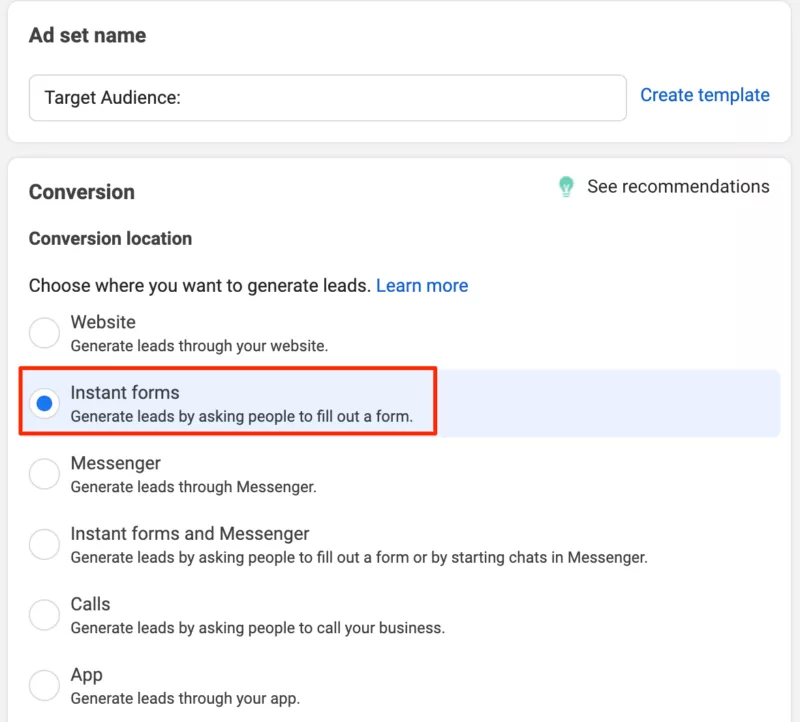
When you pick the Leads objective in Ads Manager, Meta asks you to choose a conversion location: the place where someone actually hands over their details. Instant Forms is the most popular option, but it’s not the only one.
| Conversion location | Where the form lives | Best for |
|---|---|---|
| Instant Forms | Inside Facebook/Instagram, pre-filled from the user’s profile | Fastest setup, lowest cost per lead, mobile audiences |
| Website | A landing page on your own site (needs the Pixel or Conversions API) | High-intent offers where you want full control of the experience |
| Messenger / WhatsApp | A chat conversation with automated questions | Conversational qualification, appointment booking |
| Calls | A call button that dials your business | Urgent, phone-first services like trades and legal |
| App | Inside your mobile app | Businesses driving app signups |
This guide uses Instant Forms, because it’s the cheapest way to test lead ads and requires no landing page, no Pixel setup, and no developer. If lead quality ever becomes a problem, you can layer in qualification later (more on that below) before considering the website route.
What’s New with Meta Lead Ads in 2026?
If you last ran lead ads a couple of years ago, a few things have changed:
- Advantage+ audience is the default. For the Leads objective, Meta’s AI-driven targeting is now switched on out of the box, and your manual selections act as suggestions rather than hard limits (Meta). Step 2 covers when to keep it and when to switch it off.
- Flexible Form Delivery. A newer form setting that lets Meta automatically adjust your instant form’s elements for each person to lift completion rates (Meta Business Help Center).
- Optional lead verification. You can now add SMS one-time-code verification to instant forms (Meta Business Help Center), or a work-email filter that rejects personal Gmail and Yahoo addresses (LeadsBridge). Both stop junk submissions before they reach you.
- Conditional logic in forms. Instant forms support branching questions, so the form adapts based on earlier answers. Here’s how to create conditional answers for lead ad forms.
- Rich creative forms. You can build more visual, multi-section instant forms. See our guide to rich creative instant forms.
None of these change the core 8-step process below. They’re levers you pull once the basics are running.
Step 1: Create a Meta Lead Ad Campaign
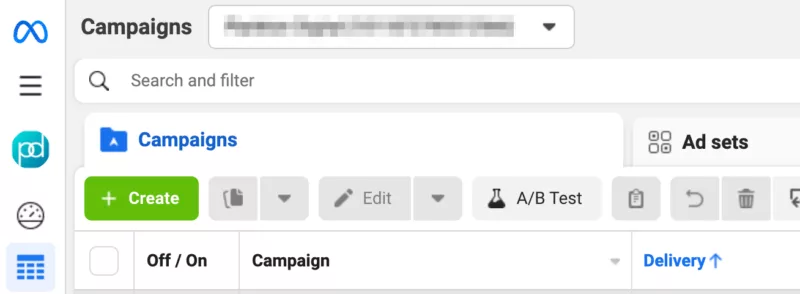
Log in to your Facebook Ads Manager account and click the Create button.
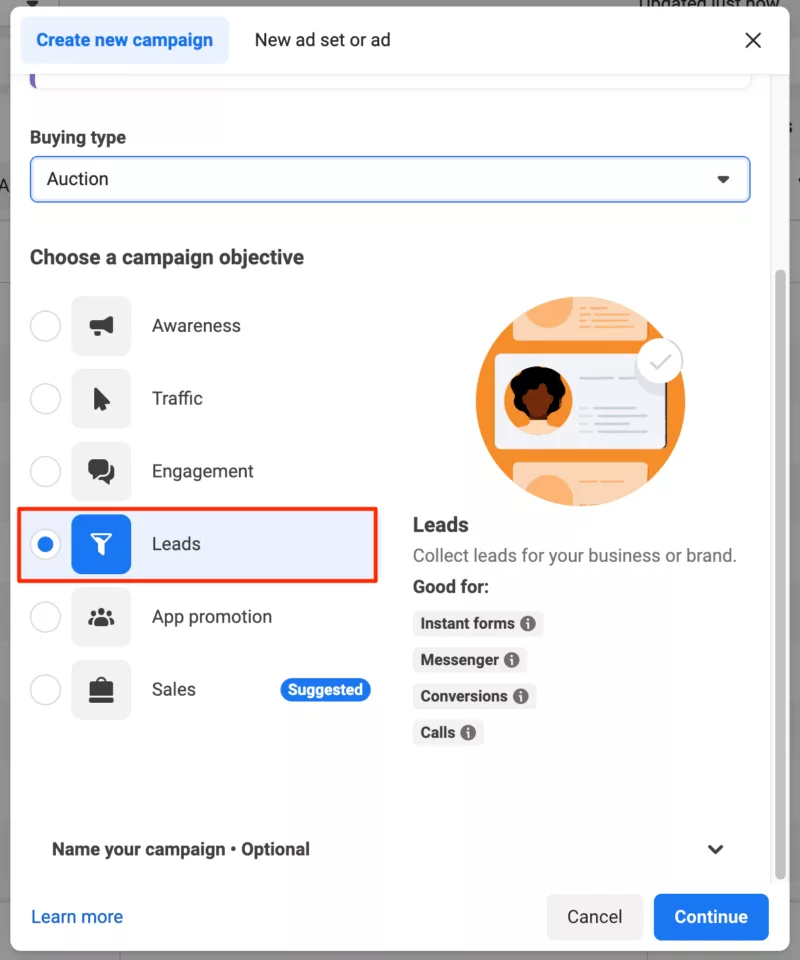
Choose Leads as your campaign objective.
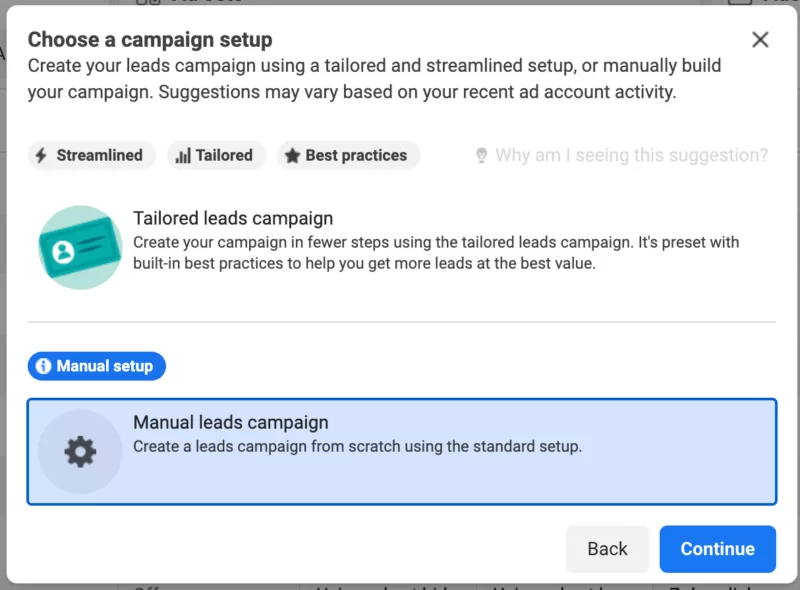
Select Manual leads campaign as the setup option.
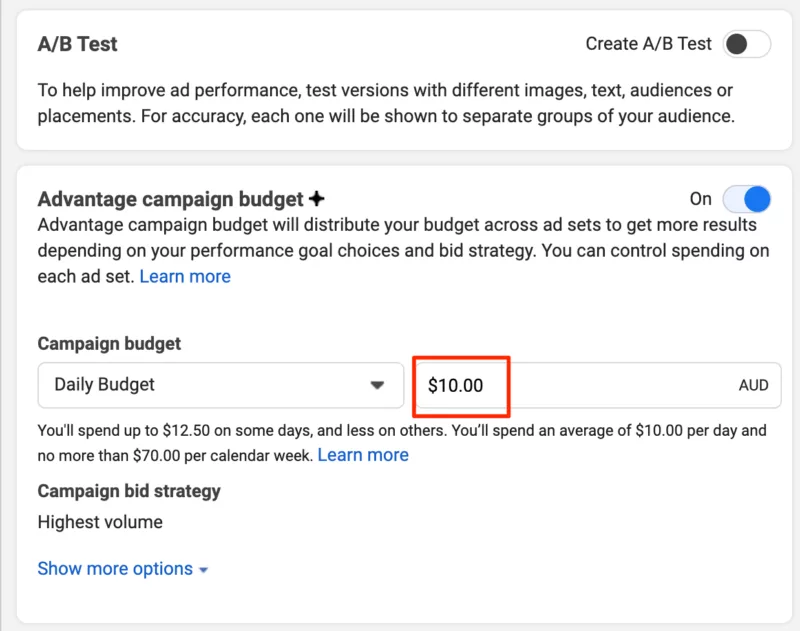
Name your campaign and set your budget.
My recommendation: start with $10-20 per day and commit to at least 5-7 days. That gives Meta’s algorithm enough data to exit the learning phase and optimize delivery. A higher spend accelerates results, but resist the urge to judge the campaign in the first 48 hours.
Click Next to move to the next section.
Name your ad set. The ad set is where you’ll choose the audience you want to target, so use a name that reflects it.
Choose Instant Forms as your conversion location.
Leave the performance goal set to Maximize number of leads, and make sure your Facebook Page is selected.

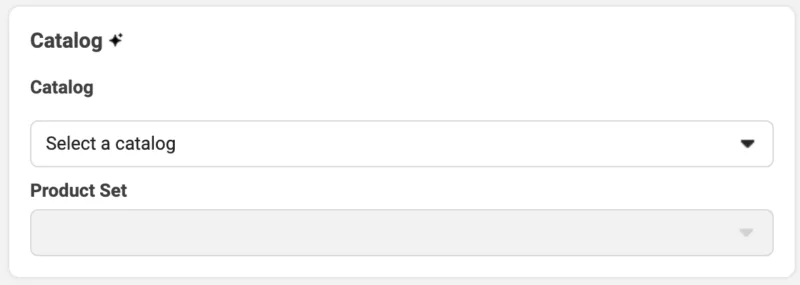
Leave the Catalog section empty:
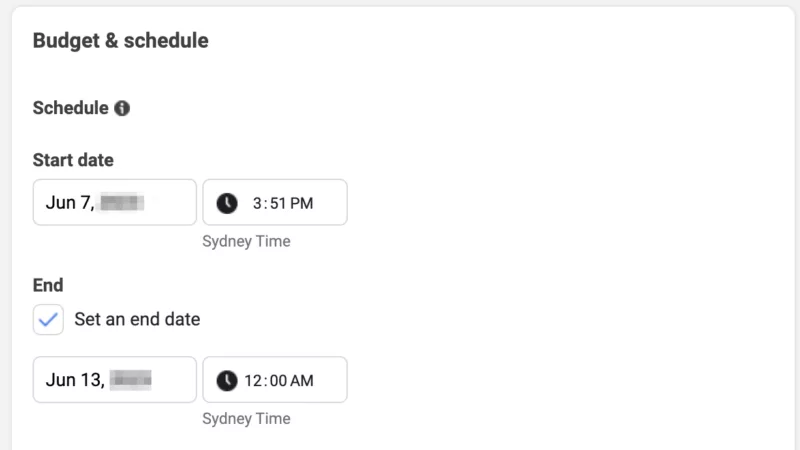
Budget & Schedule: consider setting a hard end date so you don’t overspend if you forget to switch the campaign off. One week out is a sensible default for a first test.
Step 2: Build Your Target Audience
Now it’s time to define who sees your lead ads. This step looks different than it did a few years ago, so let’s cover the current default first.
Advantage+ Audience: The New Default
For the Leads objective, Ads Manager now defaults to Advantage+ audience. Instead of a strict audience definition, Meta’s AI starts with your inputs and then expands beyond them whenever it predicts it can find leads at a lower cost. In practice:
- Audience controls (location, minimum age, language, exclusions) are hard limits Meta will always respect.
- Audience suggestions (age range, gender, detailed targeting, custom audiences) are starting points, not boundaries.
When to keep Advantage+ audience on: broad consumer offers, larger budgets, and any campaign where volume matters more than precision. Meta’s delivery system generally finds cheaper leads when given room to explore.
When to switch to the original audience options: you serve a strict geographic area, you’re targeting a narrow B2B niche, or you have compliance reasons to control exactly who sees the ad. Look for the option to switch to the original audience settings within the Audience section of your ad set.
If you do switch to manual targeting, here’s the classic walkthrough.
Manual Targeting Walkthrough
- Select the location you want your ads to run in. This might be a whole country, or a radius around a postcode.
- Set your age range and gender.
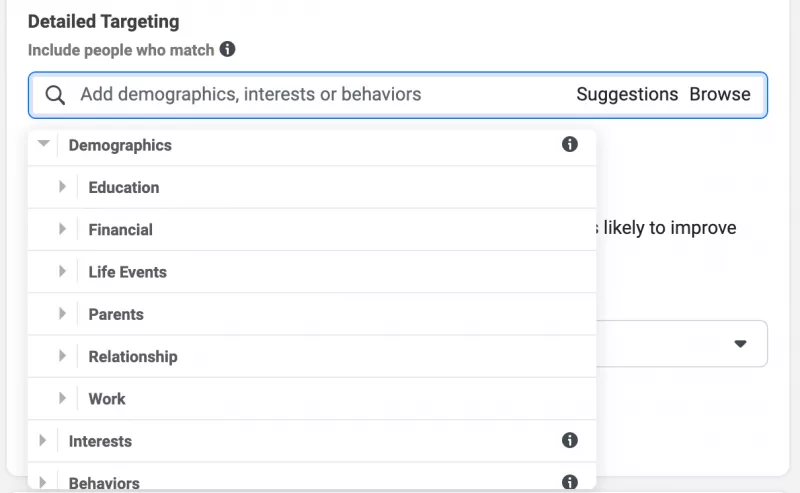
- Detailed targeting: define your audience by demographics, interests, and behaviours. There are hundreds of options, so browse around. Our Facebook ads targeting guide maps out most of what’s available.
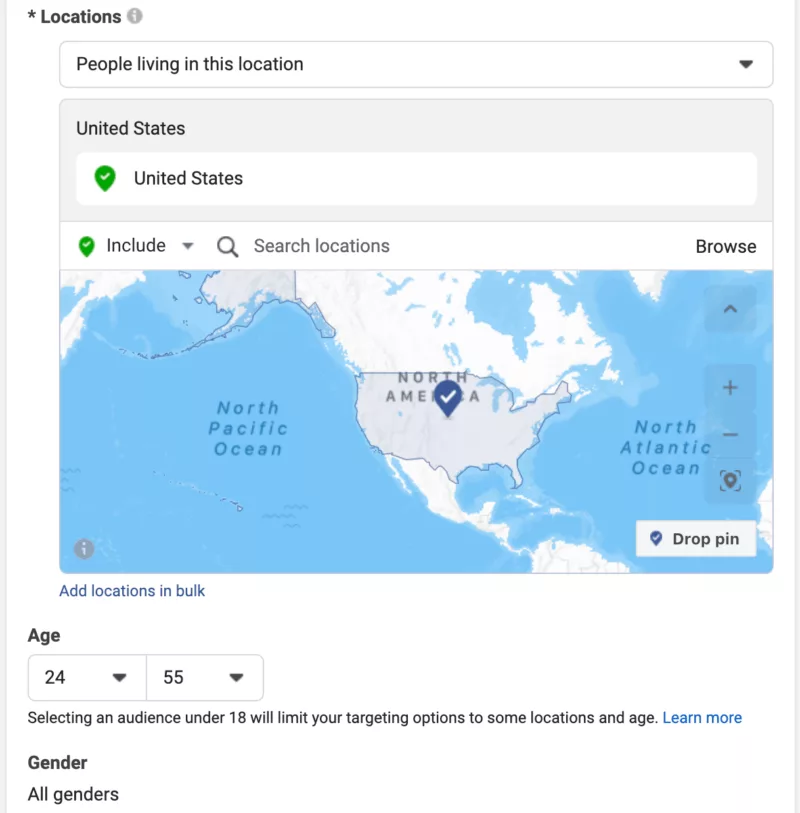
Start with a geographic region. In this example I’m targeting people living in San Francisco, California, with a 25 mile radius.
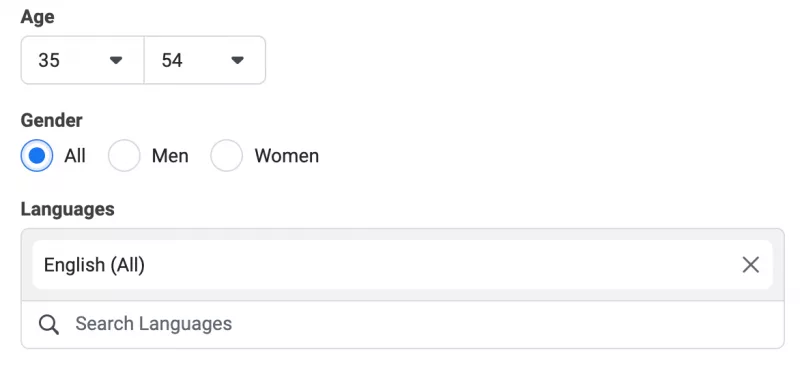
Narrow your target audience by age and gender. Primary language is optional.
If you have a customer list, uploading it as a custom audience (or building a lookalike from it) gives Meta far better raw material than interest targeting alone. Whichever route you take, don’t slice the audience too thin. Lead ads need enough volume to optimize.
Click Next.
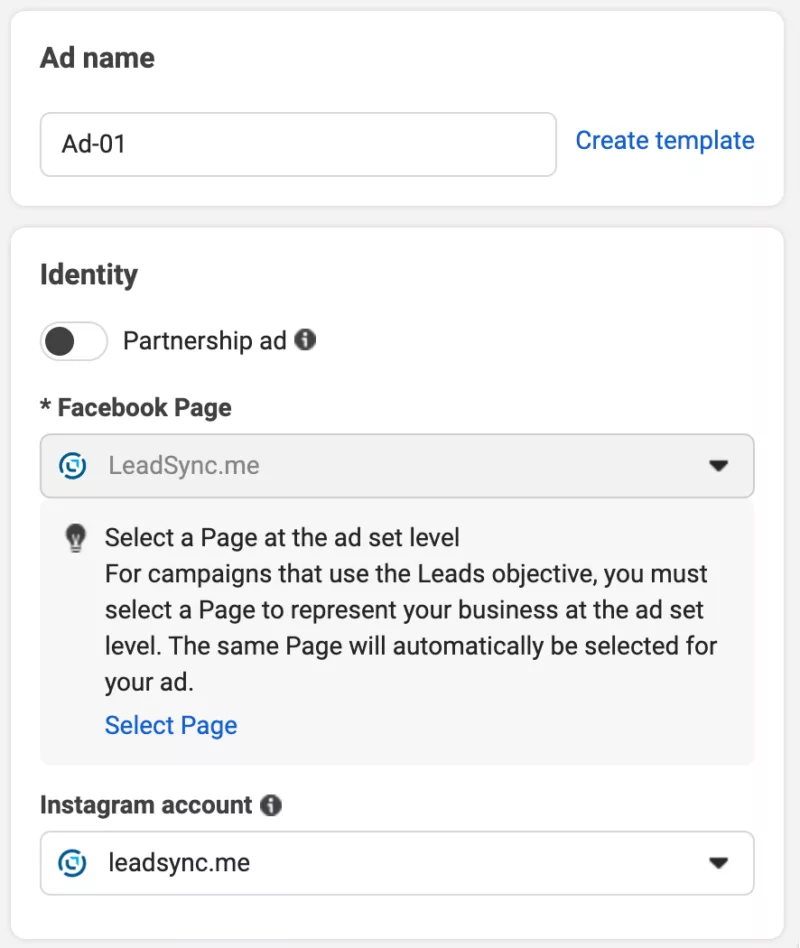
Step 3: Create Your Ad
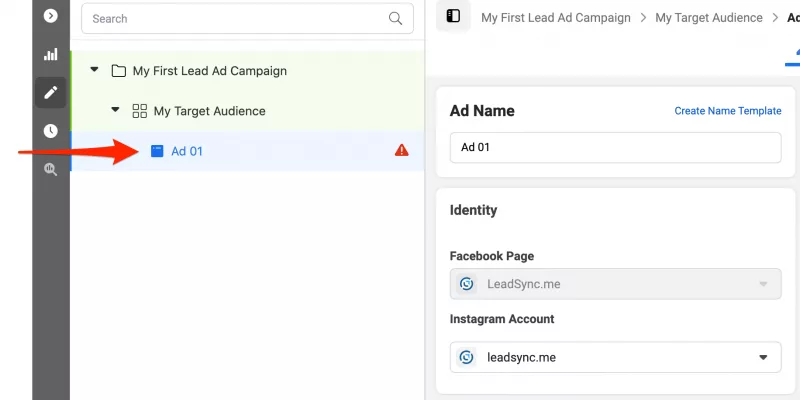
Add an ad name. I tend to use a simple naming convention here, such as “Ad 01”. Make sure the correct Facebook Page is selected, and set your Instagram account if you’ve added one to your Business Manager. Otherwise your lead ads will show on Instagram as a sponsored ad on behalf of your Page, which is fine when you’re getting started.
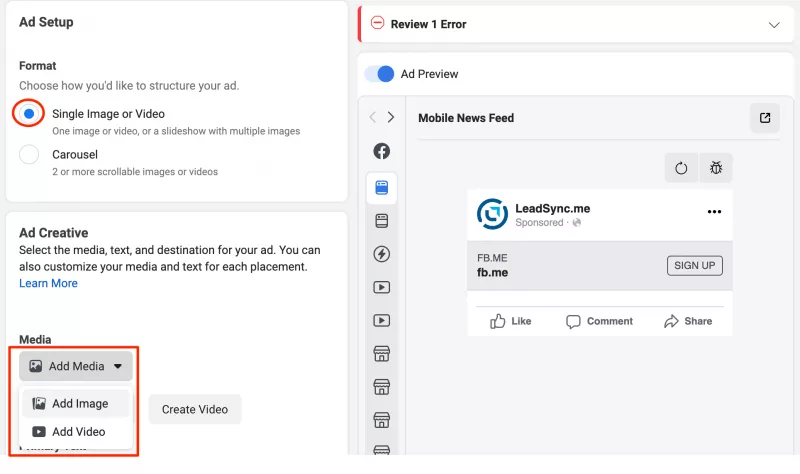
Ad setup: you’ll need either a static image or a short video (under 15 seconds). A square 1:1 image or video saves you creating multiple formats for Facebook and Instagram placements. For the exact dimensions across every placement, refer to our guide to Meta lead ad sizes and formats.
Stuck for creative ideas? Check out how to spy on your competitors’ Facebook ads to see what’s already working in your industry. If you have a little creative flair, Canva is great for DIY static ads (start with a square Instagram template), and there are plenty of other tools to help create social media ads. Prefer a professional? 99designs is a solid option.
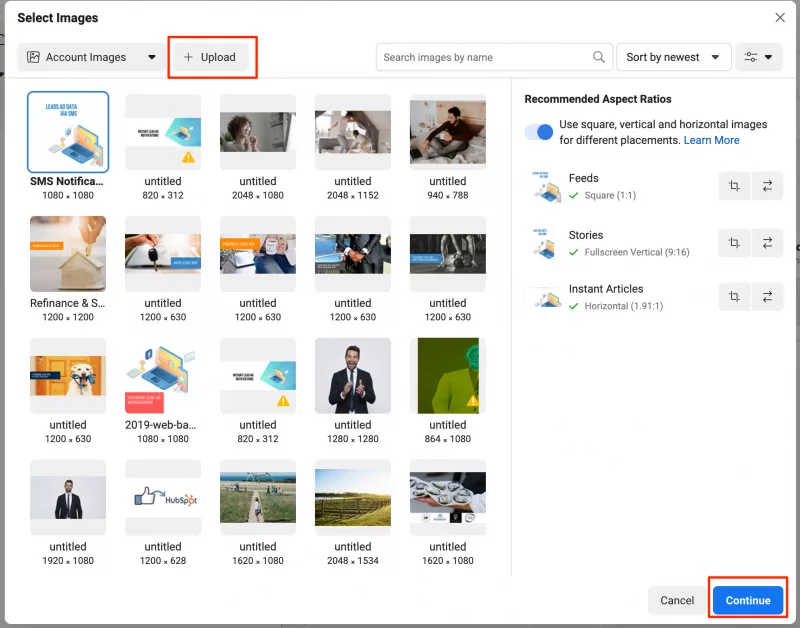
Upload your image: click Add Image, then Upload. Find the image on your computer, upload it, and click Continue.
Step 4: Write Your Ad Copy
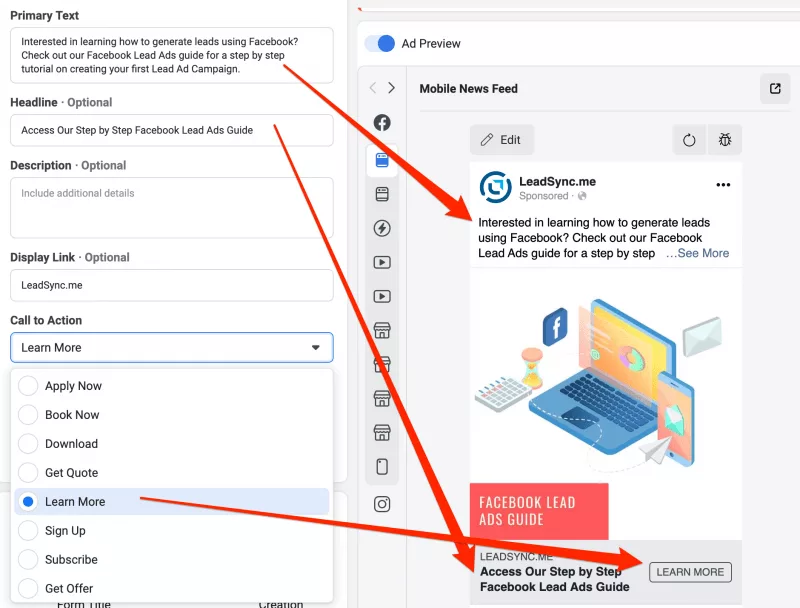
Volumes have been written on ad copy, so I won’t go deep here. Fill in your primary text and headline, and choose your call to action.
Pick a CTA that matches the ask. As you can see in the image above, there are plenty of options. In this example, I’m asking people for their name and email address before sending them to a blog post. Yep, it can be as simple as that.
If you’re struggling with copy, an AI tool like ChatGPT can get you unstuck. Just rewrite the output in your own voice before publishing.
Step 5: Create Your Lead Form
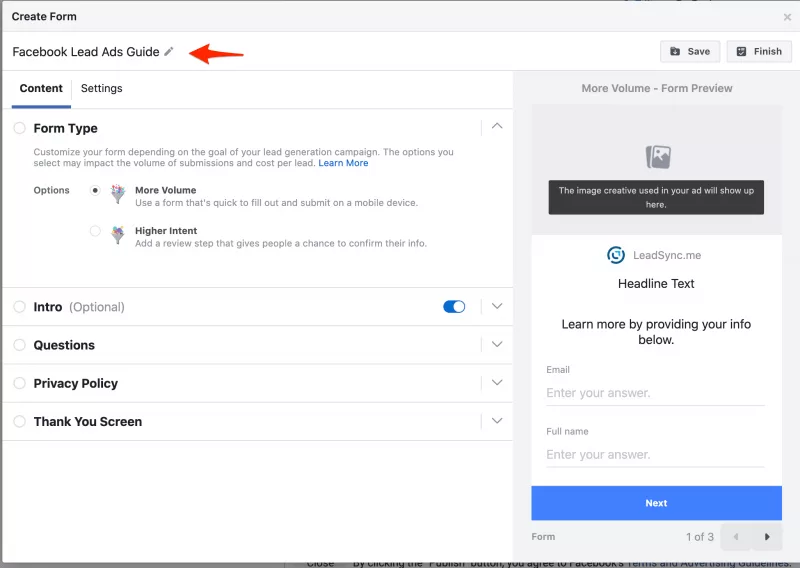
Time to create your lead form. This is what people see when they tap your ad. Click the Create Lead Form button in the Instant Form section and name your form so it’s easy to find later, once you’re running multiple campaigns.
Leave the More Volume default form type selected for now.
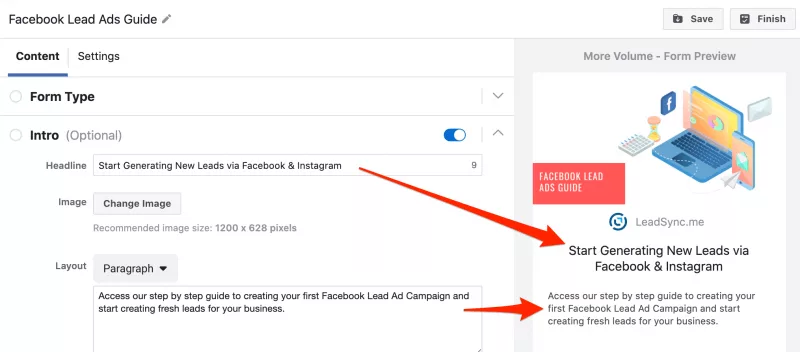
Fill in the intro: add a headline and a short paragraph reiterating what people get after they submit. By default the form uses your ad image as the header image, but you can customise it.
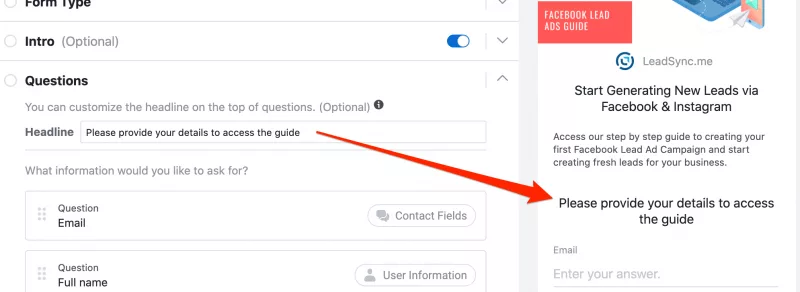
Add a headline that will appear above the form fields.
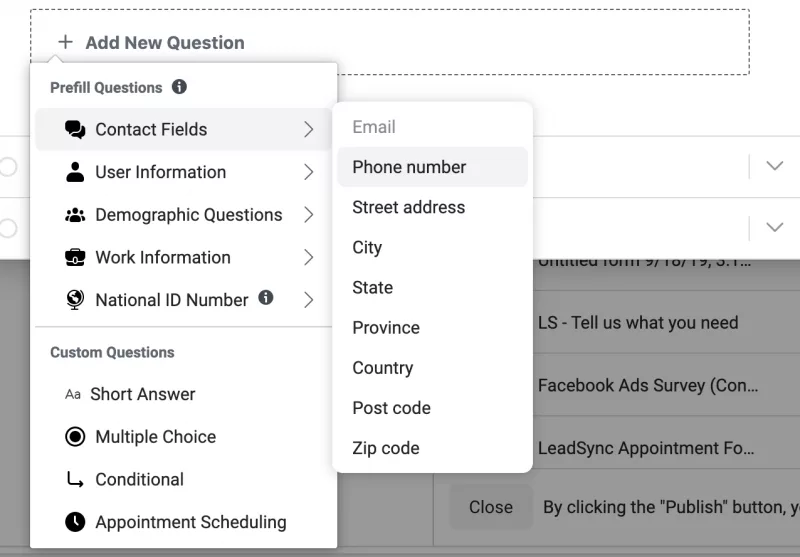
Customise your form questions: by default the form asks for full name and email address, but there are plenty more questions available to qualify leads. Keep it to 3-4 fields to start; every extra field lowers completion. Here’s the list of all the pre-filled fields you can use. Pre-populated fields pull data straight from the person’s Facebook profile, which is exactly why instant forms convert so well.
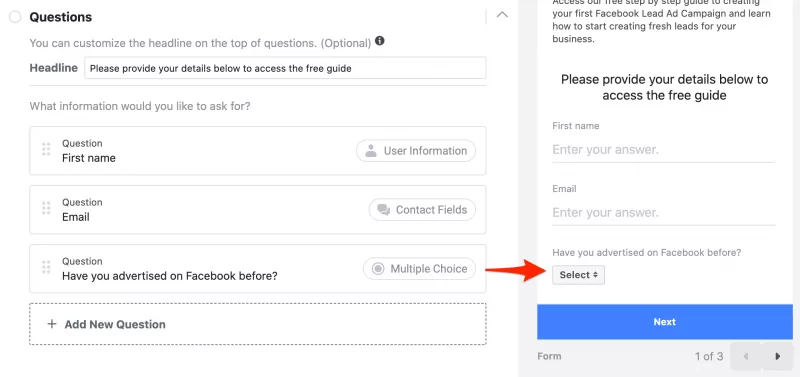
In the example above, I’ve asked for first name, email address, and a simple Yes/No question. That one typed or tapped answer does a surprising amount of junk-filtering.
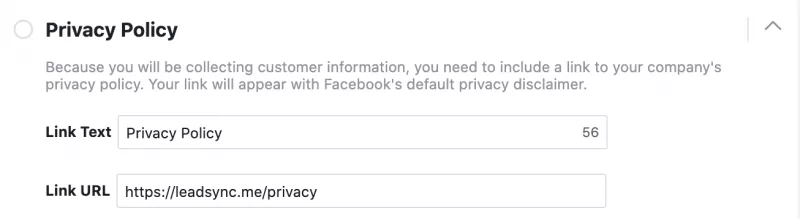
Link to your privacy policy: Meta requires one on every lead form. Hopefully you have a privacy policy on your website; add the link here. If you don’t, use our free Facebook privacy policy generator to create one. It gives you a hosted URL, so you don’t even need a website.
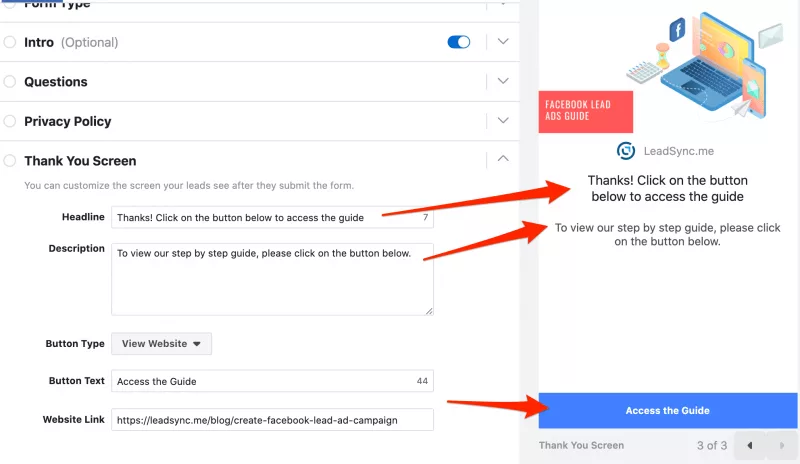
Customize your thank you screen: this is what people see after submitting. It can be as simple as “Thanks, we’ll be in touch shortly”, or you can add a link to content, a booking page, or your website.
Click Finish to complete your form.
If you want fewer, better-qualified leads, check out the Higher Intent form type, which adds a review step before submission.
Step 6: Publish Your Campaign
Click the Publish button at the bottom right of the screen. Your campaign goes into Meta’s ad review queue, and most ads are approved within 24 hours.
Step 7: Access Your Leads
There are two ways to access your leads:
- Download them manually from Facebook. This means logging in and exporting a CSV from your Page’s Forms Library. Here’s how to download leads from Facebook.
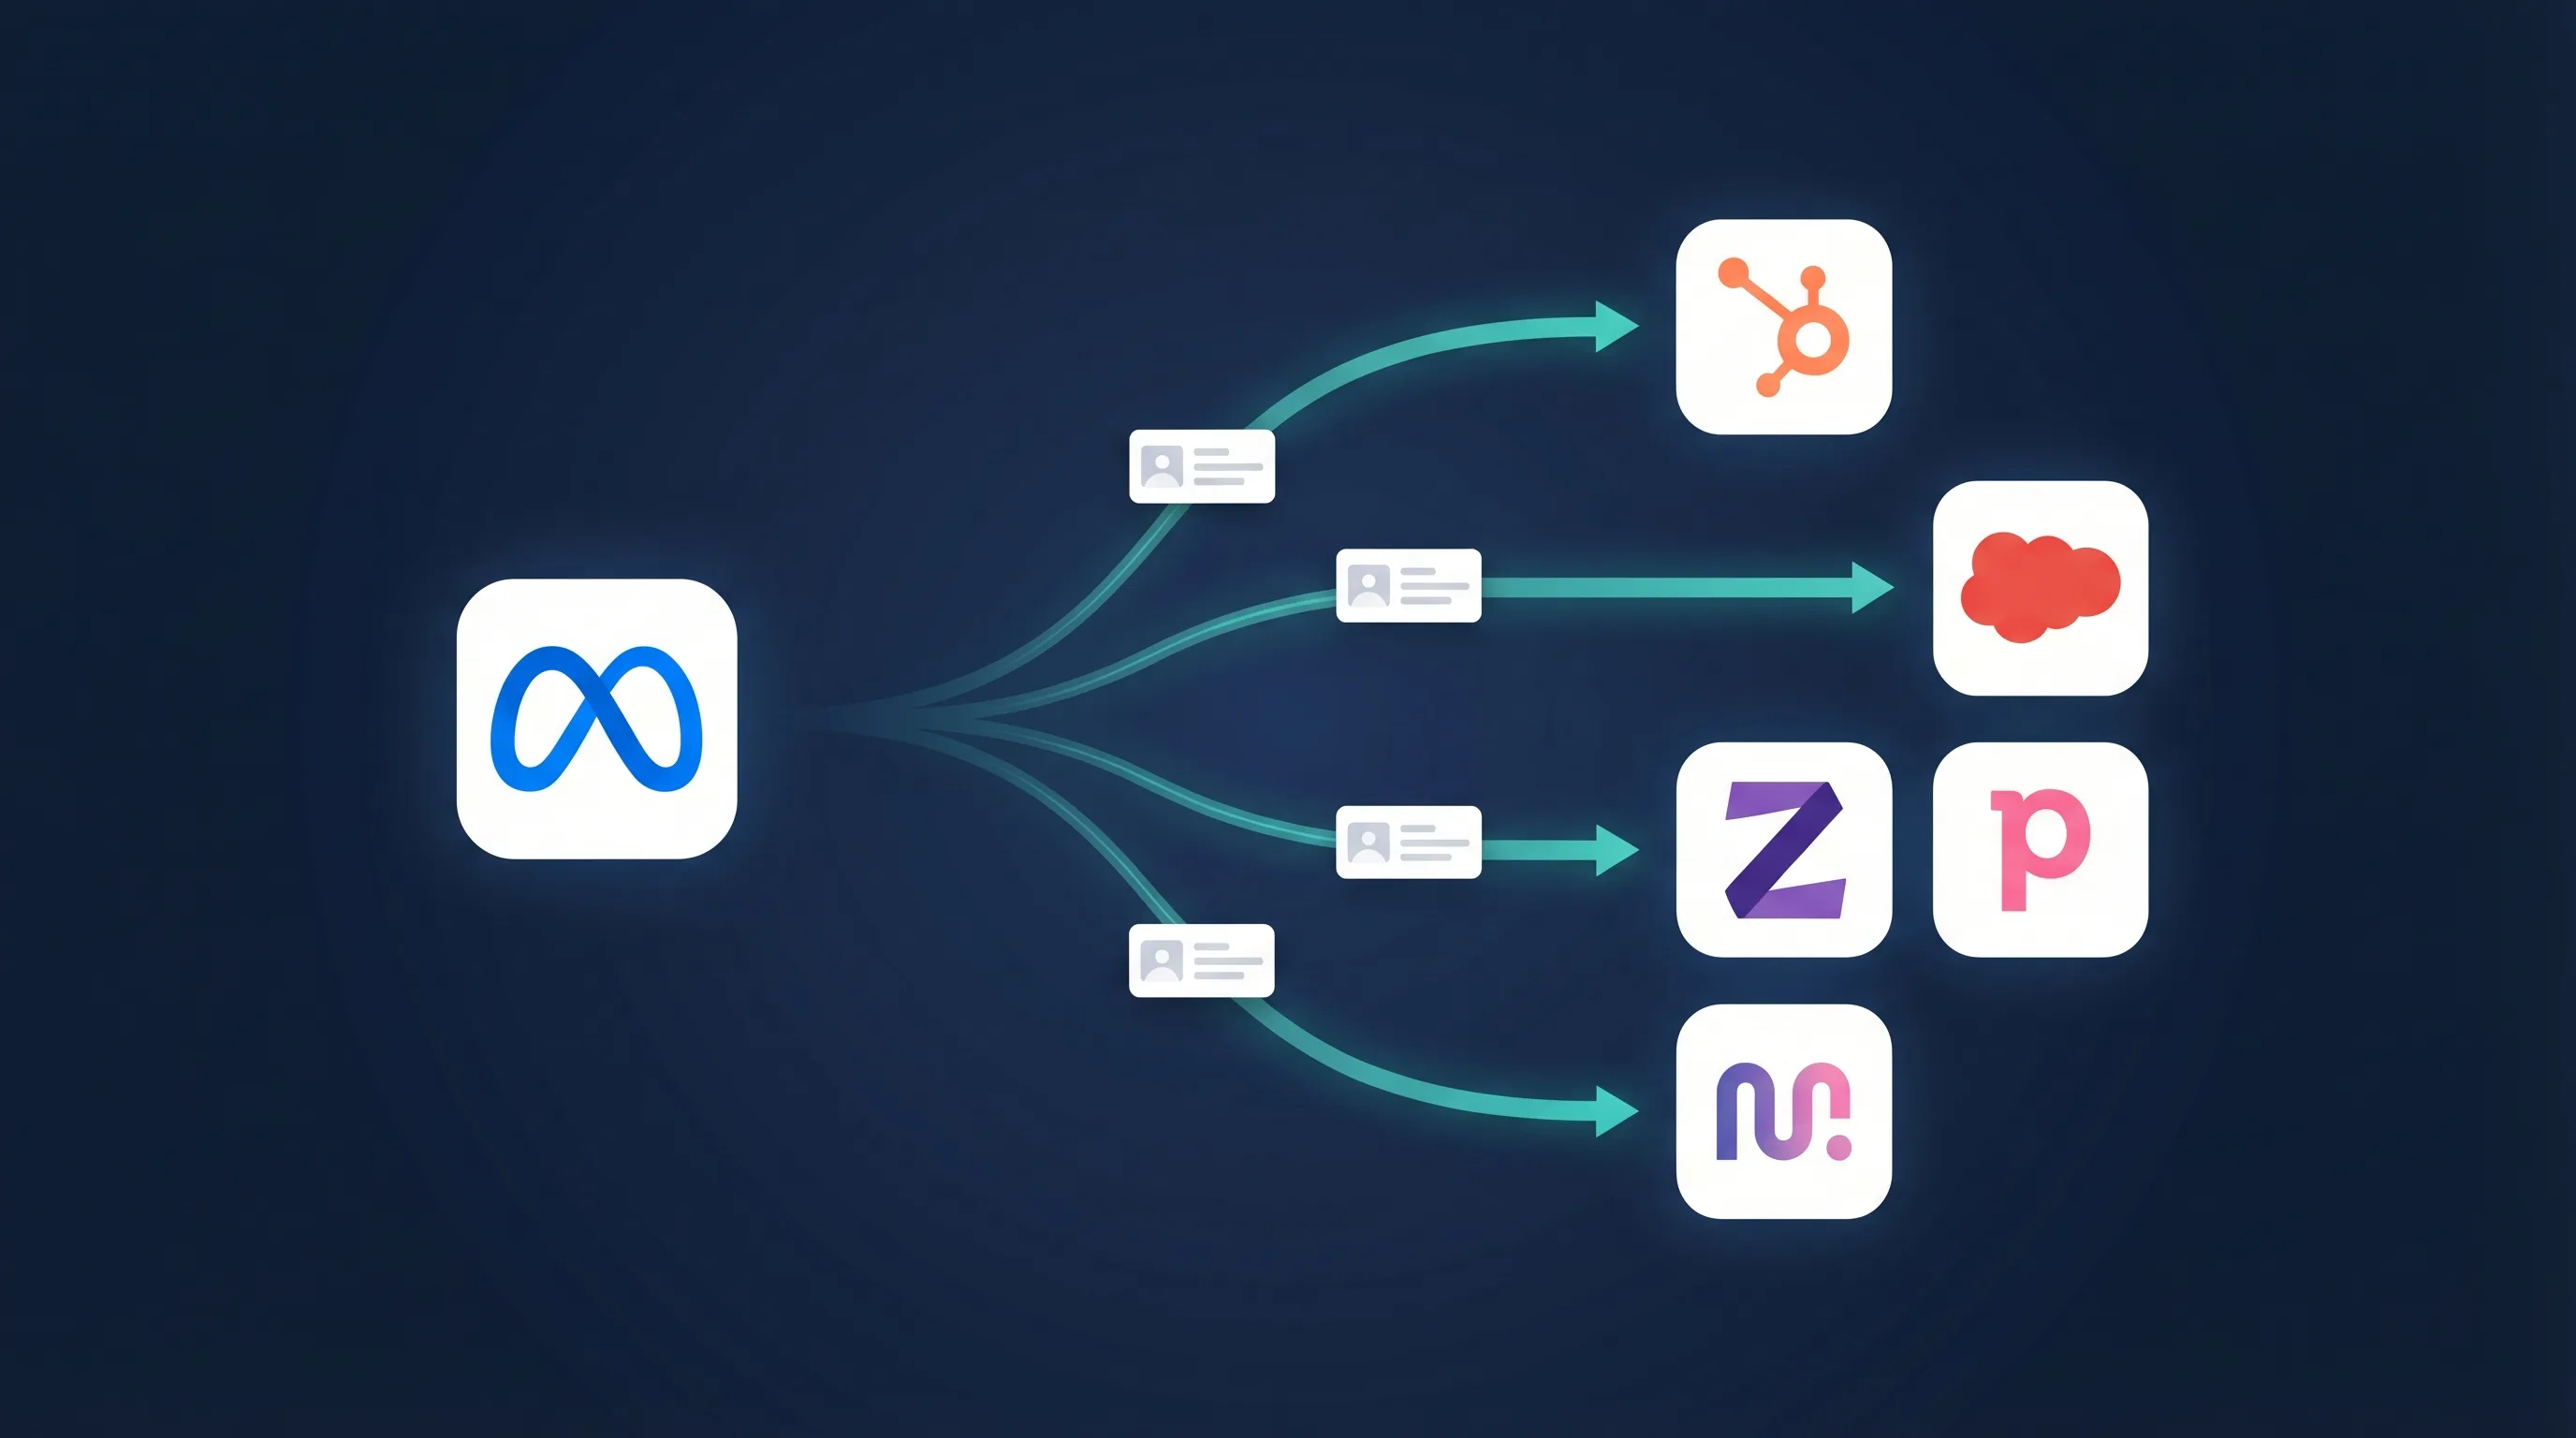
- Connect a third-party app. That’s where we come in. Create a LeadSync account to get instant email notifications for every lead, or send leads straight to your CRM, email marketing platform, or phone via SMS.
Manual downloads work fine for a low-volume test. The moment leads start feeding a sales process, though, delivery speed matters (see the follow-up section below), and if you want leads flowing into a sales pipeline automatically, here’s our full guide to connecting Facebook lead ads with a CRM.
Step 8: Monitor Your Cost Per Lead
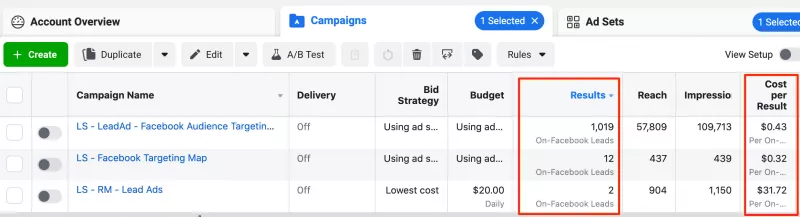
Check your campaign’s performance regularly in Ads Manager. The number to watch is Cost Per Result: your cost per lead. Compare it against the benchmarks in the cost section below, and give the campaign the full 5-7 days before making big changes.
Congratulations, you’ve launched your first Meta lead ad campaign.
Lead Ads vs Conversion Ads: Which Should You Use?
One of the most common questions advertisers face is whether to use lead ads (with instant forms) or conversion ads (that send people to a landing page). Here’s how they compare:
| Lead Ads (Instant Forms) | Conversion Ads (Landing Page) | |
|---|---|---|
| User experience | Form opens inside Facebook, no page load | User leaves Facebook to visit your website |
| Conversion rate | Higher (2-5x) due to pre-filled fields and less friction | Lower; each page load step loses users |
| Lead quality | Can be lower (accidental submits). Use Higher Intent forms to improve. | Generally higher; more deliberate action required |
| Cost per lead | Typically 30-50% cheaper | Higher, but often better quality |
| Landing page needed? | No, the form is native to Facebook | Yes, and it needs to be fast and mobile-optimized |
| Best for | Volume-focused campaigns, mobile audiences, simple offers | High-value offers, complex products, retargeting |
Our recommendation: start with lead ads. They’re cheaper to test, faster to set up, and convert better on mobile. If lead quality is an issue, switch to Meta’s Higher Intent form type before moving to conversion ads.
How Much Do Facebook Lead Ads Cost?
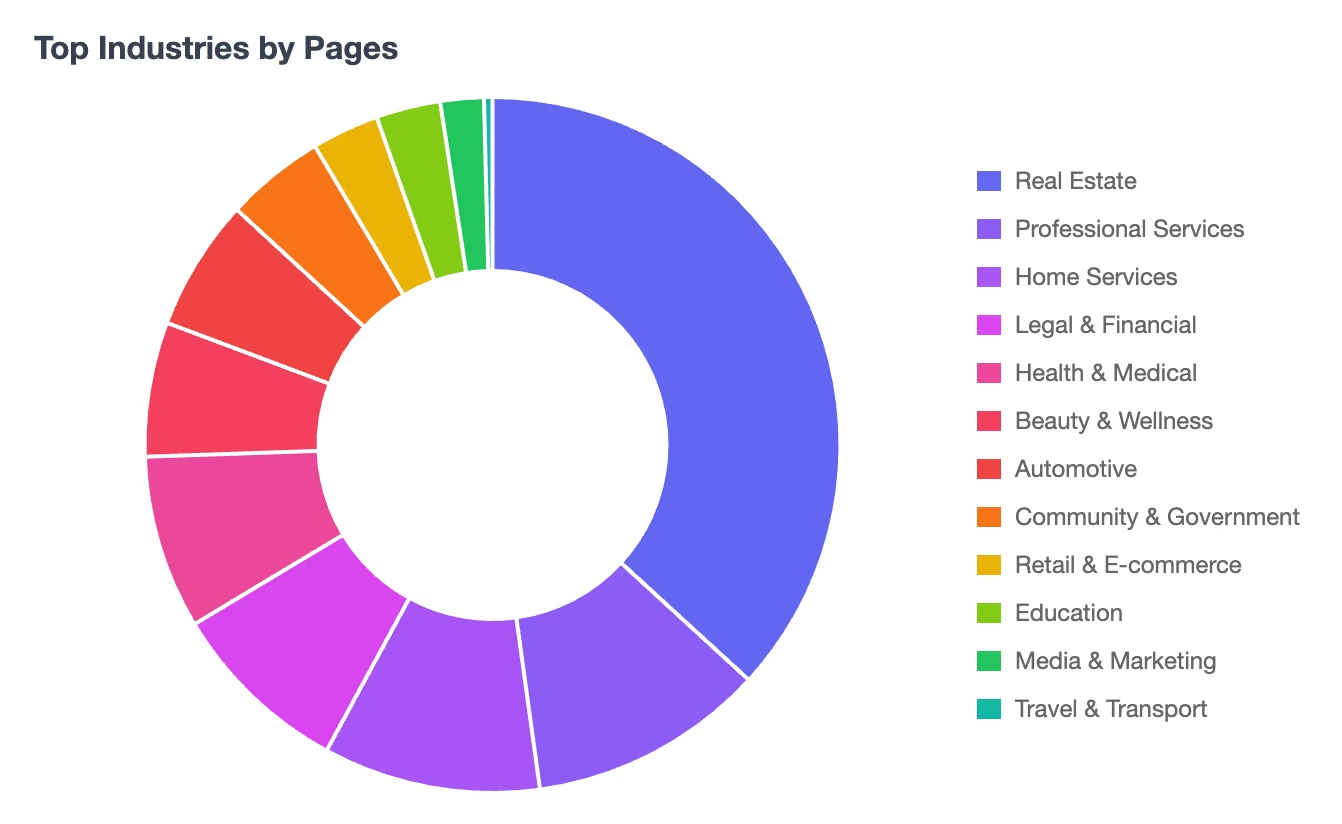
Facebook lead ad costs vary widely by industry, location, and targeting. Here are average cost-per-lead (CPL) benchmarks to help you set realistic expectations:
| Industry | Average CPL | Conversion Rate |
|---|---|---|
| Real Estate | $15 - $35 | 6 - 9% |
| Home Services | $20 - $45 | 7 - 10% |
| Automotive | $25 - $50 | 5 - 7% |
| Education | $15 - $30 | 8 - 12% |
| Health & Fitness | $30 - $55 | 6 - 8% |
| Dental | $50 - $80 | 8 - 10% |
| Insurance | $30 - $60 | 5 - 8% |
| E-commerce | $10 - $25 | 9 - 12% |
| B2B / SaaS | $35 - $75 | 4 - 7% |
Key factors that affect your CPL:
- Audience size: narrow audiences cost more per lead but convert better
- Number of form fields: every additional field pushes CPL up. Keep it to 3-4 fields to start.
- Ad creative quality: in our experience, video ads often produce 20-30% lower CPLs than static images
- Time of year: Q4 (Oct-Dec) CPLs run 20-40% higher due to holiday ad competition
- Geographic targeting: US/UK/AU leads cost 2-3x more than emerging markets
Budget-wise, the recommendation from Step 1 applies: $10-20/day for at least 5-7 days gives Meta’s algorithm enough data to optimize delivery before you judge the results.
Meta Lead Generation Strategies That Lower Your Cost Per Lead
Once your first campaign is live, these are the levers that actually move CPL and lead quality. Most of them appear elsewhere in this guide; here they are in one place.
- Trim your form. Three to four fields is the sweet spot. Add qualifying questions only when junk volume justifies the CPL increase.
- Add one typed question. A question that can’t be answered by tapping a pre-filled value filters out accidental submissions cheaply.
- Switch to Higher Intent when quality slips. The review screen cuts volume slightly but noticeably improves quality.
- Turn on lead verification for junk-prone offers. SMS one-time-code or work-email prompts stop fake contact details at the source.
- Refresh creative before you touch targeting. Creative fatigue drives CPL up faster than audience choice. Test a new image or short video every few weeks.
- Give Advantage+ audience room to work. Overly narrow audiences fight the delivery system. Set hard controls only where the business genuinely requires them.
- Graduate to Conversion Leads optimization. Covered next; this is the biggest quality lever once you have follow-up data flowing.
What Is Conversion Leads Optimization?
By default, Meta optimizes for more leads. Conversion Leads is an alternative performance goal that optimizes for leads likely to convert into customers. Instead of judging success at form submission, Meta learns from what happens afterwards: which leads became qualified, booked a call, or bought.
To use it, you need to send lead-stage updates from your CRM back to Meta through the Conversions API, so the algorithm can see which leads progressed. That means it’s not a day-one feature; you need lead flow and a follow-up process first. But for advertisers who’ve been burned by high volumes of cheap, low-quality leads, it’s usually the single most effective fix. LeadSync’s CRM connections get your leads into that follow-up pipeline in the first place, which is the prerequisite for all of it.
What Happens After the Lead Comes In?
Creating the ad is only half the battle. What you do after someone submits your lead form determines whether they become a customer or ghost you.
Speed matters most: leads contacted within 5 minutes are 9x more likely to convert than those contacted after 30 minutes (Harvard Business Review). The same HBR research found most companies take far too long to respond, if they respond at all. Responding within minutes is a genuine competitive advantage precisely because so few businesses do it.
How to follow up fast:
- Set up instant email notifications with LeadSync so your team knows the moment a lead arrives (delivered in under 60 seconds).
- Enable an autoresponder to automatically send the lead a confirmation email with next steps or a PDF attachment.
- Send leads to your CRM so they’re added to your pipeline and assigned to the right rep automatically.
- Add SMS notifications for high-priority forms so someone can call back within minutes. (SMS delivery uses credits on top of your plan.)
The businesses that win with lead ads aren’t the ones with the best targeting. They’re the ones who respond fastest.
Troubleshooting Facebook Lead Ads
Running into issues? Here are the most common problems and how to fix them:
Lead form not showing on your ad
- Make sure you selected Instant Forms as the conversion location (not Website or Calls)
- Confirm the form is attached to your ad; check the Ad level in Ads Manager
- Ensure the form is published, not still in draft
Not receiving leads / leads not syncing
- Check your Page permissions; you need Admin access to receive leads
- Your Facebook access token may have expired. Reconnect your account in your integration tool. (LeadSync alerts you when a reconnect is needed.)
- Use Meta’s lead ads testing tool to send a test lead and verify your connection
Low lead quality / junk submissions
- Switch your form type from More Volume to Higher Intent, which adds a review step before submission
- Add a custom question that requires typing, not just tapping pre-filled fields
- Consider Meta’s Conversion Leads optimization (covered above) to train the algorithm on leads that actually convert
Need to change a published lead form?
Published forms are locked, but you don’t have to start from scratch. Open your Forms Library, select the form, and duplicate it. Make your edits to the copy, save it under a new name, then attach the new form to your ad. If you use a lead delivery tool, pair the new form there too. Meta treats it as a completely separate form.
Ad rejected or form won’t publish
- Make sure your privacy policy URL is valid and accessible
- Check that your ad doesn’t violate Meta’s advertising policies (common issues: before/after images, health claims, personal attributes)
- If your form was previously disapproved, duplicate and edit rather than resubmitting the same form
Privacy & Compliance (GDPR, CCPA)
If you’re collecting leads from users in the EU, UK, or California, you need to comply with data privacy regulations. Here’s what to know:
- Privacy policy is mandatory: Meta requires a privacy policy link on every lead form. If you don’t have one, use our free Facebook privacy policy generator; it hosts the policy for you.
- Custom disclaimer: for GDPR compliance, add a custom disclaimer to your lead form explaining how you’ll use the data and capturing explicit consent. Enable the Custom Disclaimer option in your form settings.
- Data retention: Meta makes lead data available for 90 days from submission, then it expires. Download leads regularly, or sync each new lead to your CRM or email platform in real time so nothing slips through the window.
- Right to deletion: under GDPR, users can request that you delete their data. Have a process in place to handle these requests.
- CCPA opt-out: California residents have the right to opt out of data sales. If you’re running lead ads targeting California, include appropriate disclosures.
For most businesses the key steps are: (1) add a privacy policy to your form, (2) enable the custom disclaimer for EU audiences, and (3) set up real-time lead delivery from day one so the 90-day expiry never costs you a lead.
Frequently Asked Questions
How much do Facebook lead ads cost?
The average cost per lead ranges from $10 to $80 depending on your industry, targeting, and ad quality. E-commerce and education tend to be cheapest ($10-$30), while dental and B2B can run $50-$80 per lead. Start with a $10-20/day budget for at least 5-7 days and optimize from there.
Can I edit a lead form after publishing?
Not directly. Once a lead form is published, Meta locks it. The workaround is to duplicate the form in your Forms Library, edit the copy, save it under a new name, then attach the new form to your ad. If you use a lead delivery tool, remember to pair the new form as well, since Meta treats it as a separate form.
Should I use Advantage+ audience for lead ads?
Advantage+ audience is the default for the Leads objective and works well for broad consumer offers with room in the budget for Meta’s AI to learn. Switch to the original audience options when you need strict boundaries, like a local service area, a narrow B2B niche, or compliance-sensitive targeting.
Do Facebook lead ads work for B2B?
Yes, but with caveats. B2B lead ads typically have higher CPLs ($35-$75) and need tighter targeting. Use job title and industry targeting, add qualifying custom questions like company size or budget, and consider LinkedIn Lead Gen Forms if your audience lives on LinkedIn.
What’s the minimum budget for Facebook lead ads?
Technically you can start with as little as $1/day, but we recommend $10-20/day for at least 5-7 days to give Meta’s algorithm enough data to optimize. Running less than $5/day often results in poor delivery and unreliable data.
Can I use lead ads on Instagram too?
Yes. When you create a Facebook lead ad campaign, your ads automatically run on both Facebook and Instagram unless you manually exclude placements. The instant form experience is the same on both platforms.
How do I improve lead quality from Facebook lead ads?
Three proven methods: switch from More Volume to the Higher Intent form type, which adds a review screen before submission; add custom qualifying questions that require typing an answer; and use Meta’s Conversion Leads optimization to train the algorithm on leads that actually become customers.
How quickly will I receive leads after someone submits?
If you download leads manually from Facebook, there can be delays of hours or even days. With LeadSync, leads are delivered to your email, CRM, or SMS in under 60 seconds, so you can follow up while the lead is still warm.
What happens to leads after 90 days?
Meta deletes lead data 90 days after the form is submitted. If you haven’t downloaded or synced a lead before then, it’s gone permanently. Connect a sync tool like LeadSync from day one so every new lead lands in your CRM or inbox the moment it arrives.
More Resources
For the most up-to-date official documentation on instant forms, check out Meta’s instant form FAQ.