EmailOctopus is one of the most affordable ways to run real email marketing, with a free plan that covers up to 2,500 contacts and full API access on every tier. What it does not do is pull leads out of Facebook for you. There is no native Facebook Lead Ads integration inside EmailOctopus, so most people fall back on Zapier or a manual CSV export just to get a new lead from a Meta form into a list.
LeadSync does that job directly: one connection, real-time sync, and no Zaps in the middle.
Key Takeaways
- EmailOctopus has no built-in Facebook Lead Ads integration, so leads have to be pushed in from outside.
- LeadSync syncs new Facebook and Instagram leads into EmailOctopus in under a minute using the official EmailOctopus API.
- It works on the EmailOctopus free plan. API keys are available on every tier, so you do not need to upgrade just to connect.
- New contacts are added directly to the list you choose, as subscribed, so any automation triggered by that list runs straight away.
- You can apply tags to every synced lead and map any field on your Facebook form into EmailOctopus fields.
What is EmailOctopus?
EmailOctopus is an email marketing platform built around simplicity and low cost. It strips email down to the parts most senders actually use: lists, a drag-and-drop editor, basic automations, and clear reporting, without the price tag of the bigger suites. It is popular with newsletters, creators, nonprofits, and small businesses that want a clean tool and a genuinely usable free tier.
A few things worth knowing before you start:
- Lists are where your contacts live. You add a contact to a list, and lists drive your sending and automation targeting.
- Tags are labels you attach to contacts for finer segmentation (for example
facebook-leador a specific campaign name). EmailOctopus creates a tag the first time it sees it, so you do not need to set them up in advance. - Automations are sequences (a welcome series, a lead-magnet delivery) that fire when a contact joins a list.
- Custom fields let you store extra values on a contact, each identified by a field tag, for use in personalisation.
Why sync Facebook leads with EmailOctopus?
Running Facebook lead ads without an automated sync means either manually downloading the CSV from Meta Business Suite every few days, or wiring up Zapier as a relay. Both cost you speed, and in the case of Zapier, actual money every month.
Pushing leads straight to EmailOctopus the moment they submit the form gets you three things:
- Speed-to-welcome. Your EmailOctopus welcome automation fires within a minute of the form submission, while your offer is still top of mind.
- No lost leads. Daily CSV exports from Meta leak leads: people forget, Meta throttles the download, the file gets mis-imported. A direct API push skips the spreadsheet entirely.
- Clean segmentation. Each Facebook form can feed a different EmailOctopus list, and you can tag every lead by source, so your follow-up stays organised from day one.
If email notifications are all you need, with no actual EmailOctopus sync, our Facebook lead ads email notifications guide covers the simpler setup.
Prerequisites
Before you start, make sure you have:
- A Facebook page with an active lead ad or at least one published lead form.
- An EmailOctopus account. API access is available on every plan, including the free plan, so you do not need to upgrade to connect.
- Admin access to both EmailOctopus and your Facebook page.
- A LeadSync account. A free 7-day trial is enough to get set up and send a test lead end to end.
Step 1: Set up your Facebook lead ad
If you already have a live Facebook lead ad campaign, skip to Step 2. Otherwise:
- In Meta Ads Manager, create a new campaign with the Lead Generation objective.
- Build your lead form. At a minimum, capture email and first name. Phone, last name, or custom questions are fine to add, and you can map them into EmailOctopus fields in a later step.
- Publish the form and assign it to a live ad, or save it in draft if you are setting up the plumbing first.
LeadSync can sync leads from any Facebook page you have admin access to, even from older forms you published months ago.
Step 2: Create the EmailOctopus list that will receive new leads
Each Facebook form should map to a single EmailOctopus list. That makes it easy to target different welcome automations at different lead sources.
- In EmailOctopus, go to Lists.
- Click Create a list and give it a descriptive name, for example
Facebook - Brand Lead MagnetorFB Ads - 2026 Waitlist. - You do not need to add any contacts. LeadSync will populate the list as leads come in.
If you want EmailOctopus to send a welcome email the moment a lead lands, create an automation triggered when a contact joins this list.
Step 3: Generate an EmailOctopus API key
This is the credential LeadSync uses to authenticate.
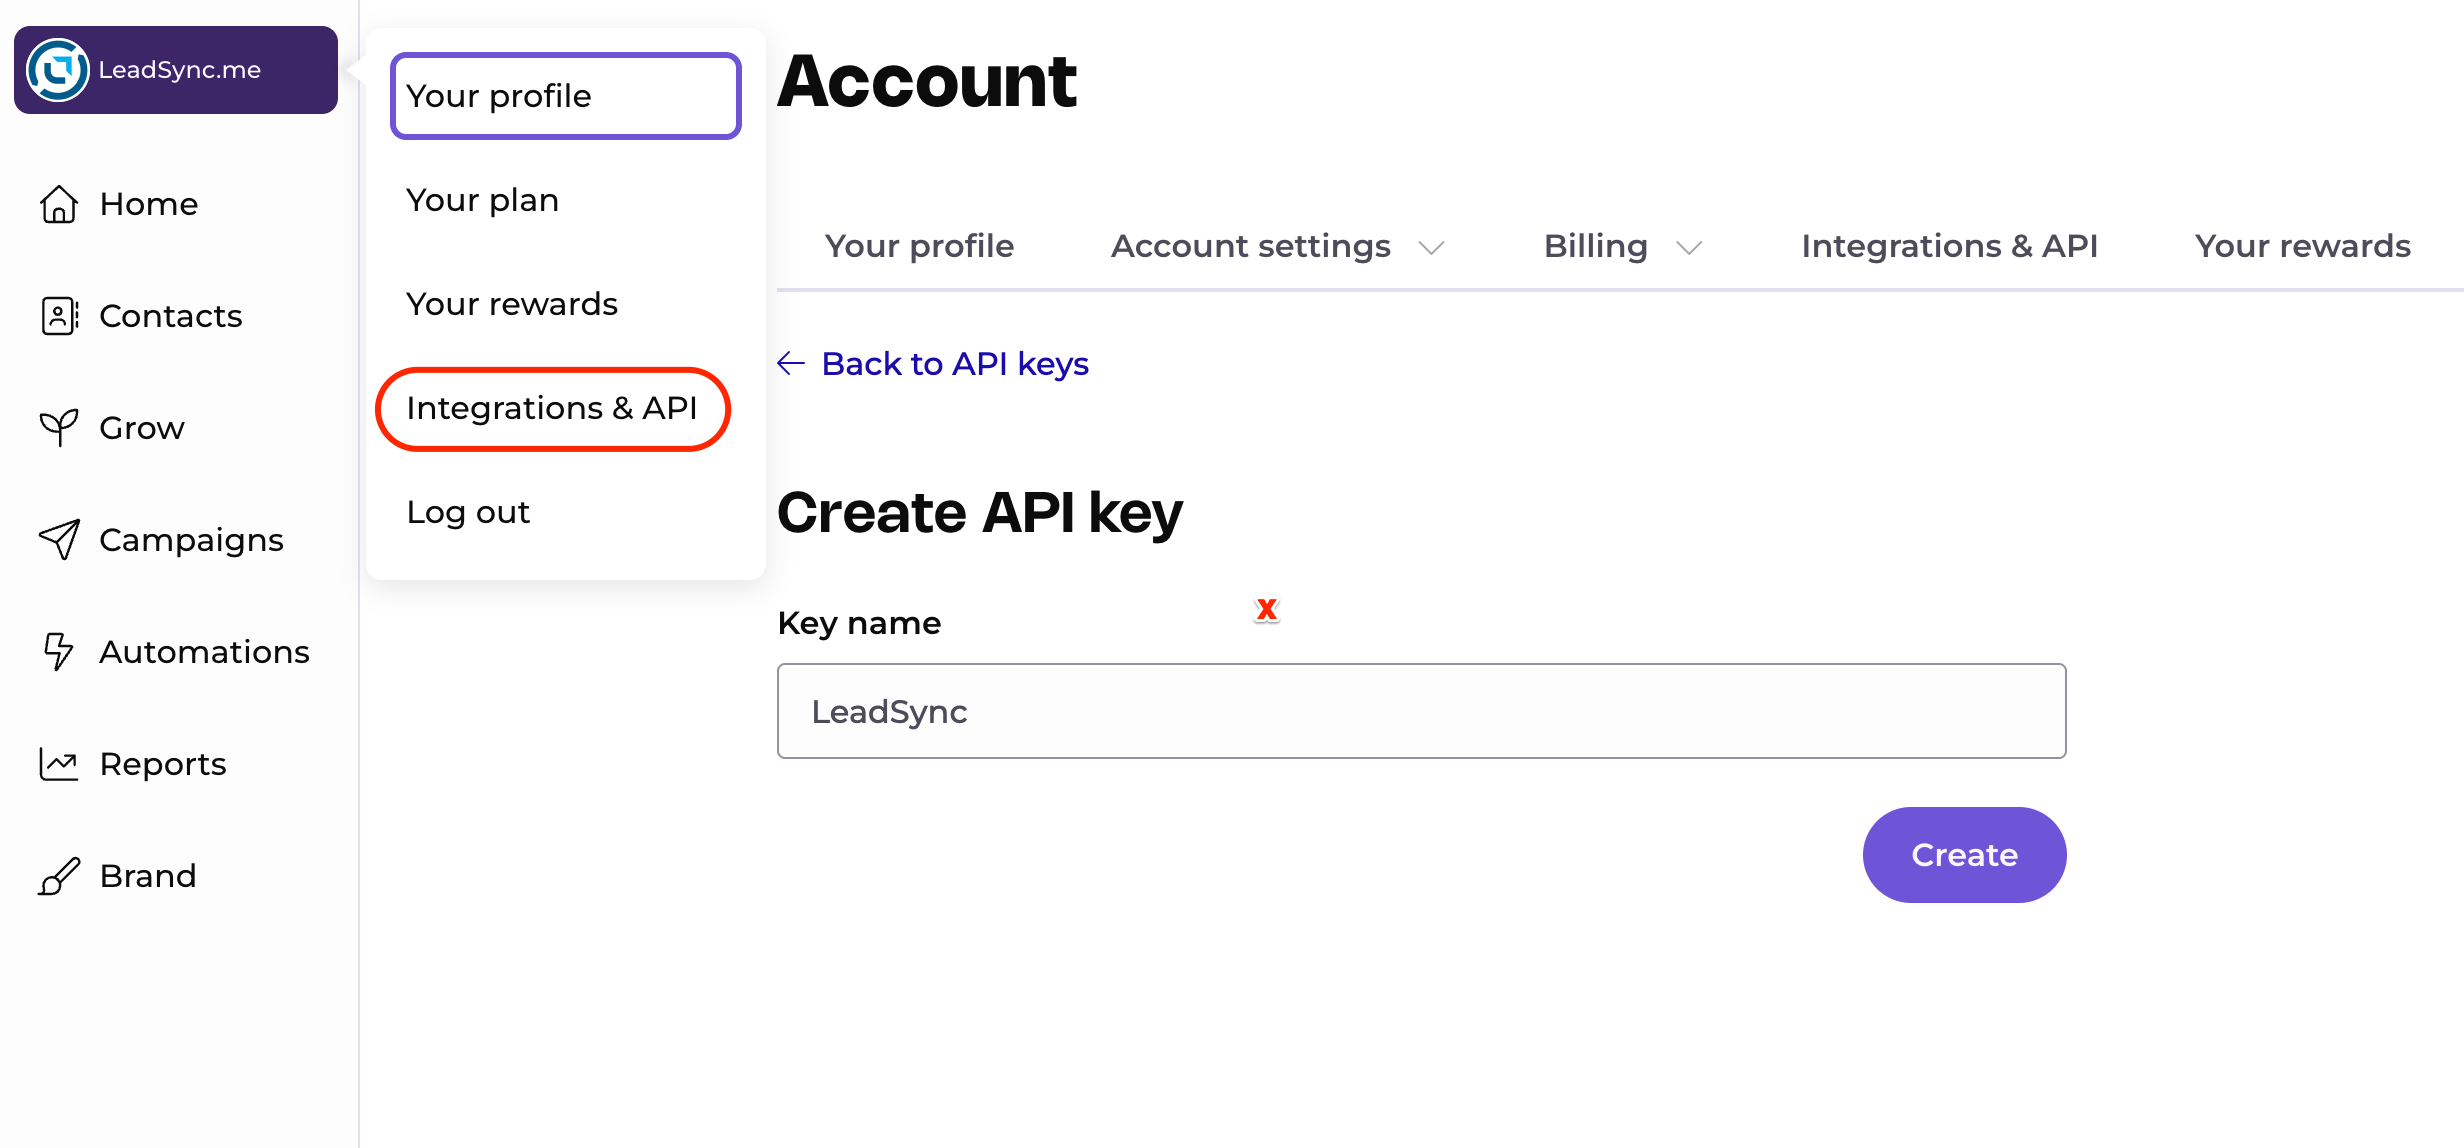
- In EmailOctopus, click your account name and choose Account.
- Open Integrations & API.
- Click Create a new API key and give it a label like
LeadSyncso you remember where it is used. - Copy the generated key. It starts with
eo_. Keep it somewhere safe.
Step 4: Connect EmailOctopus to LeadSync
- Log in to LeadSync and go to Connections → Add Connection.
- In the destination dropdown, select EmailOctopus.
- Paste your API key into the field and give the connection a recognisable name (e.g.
EmailOctopus - main account). - (Optional) In the Tags field, enter one or more comma separated tags, for example
facebook-lead, brand-magnet. Every contact synced through this connection gets these tags, and EmailOctopus creates any that do not exist yet. - Click Update Connection. LeadSync fetches your EmailOctopus lists.
- Choose the List you created in Step 2 and click Update again.
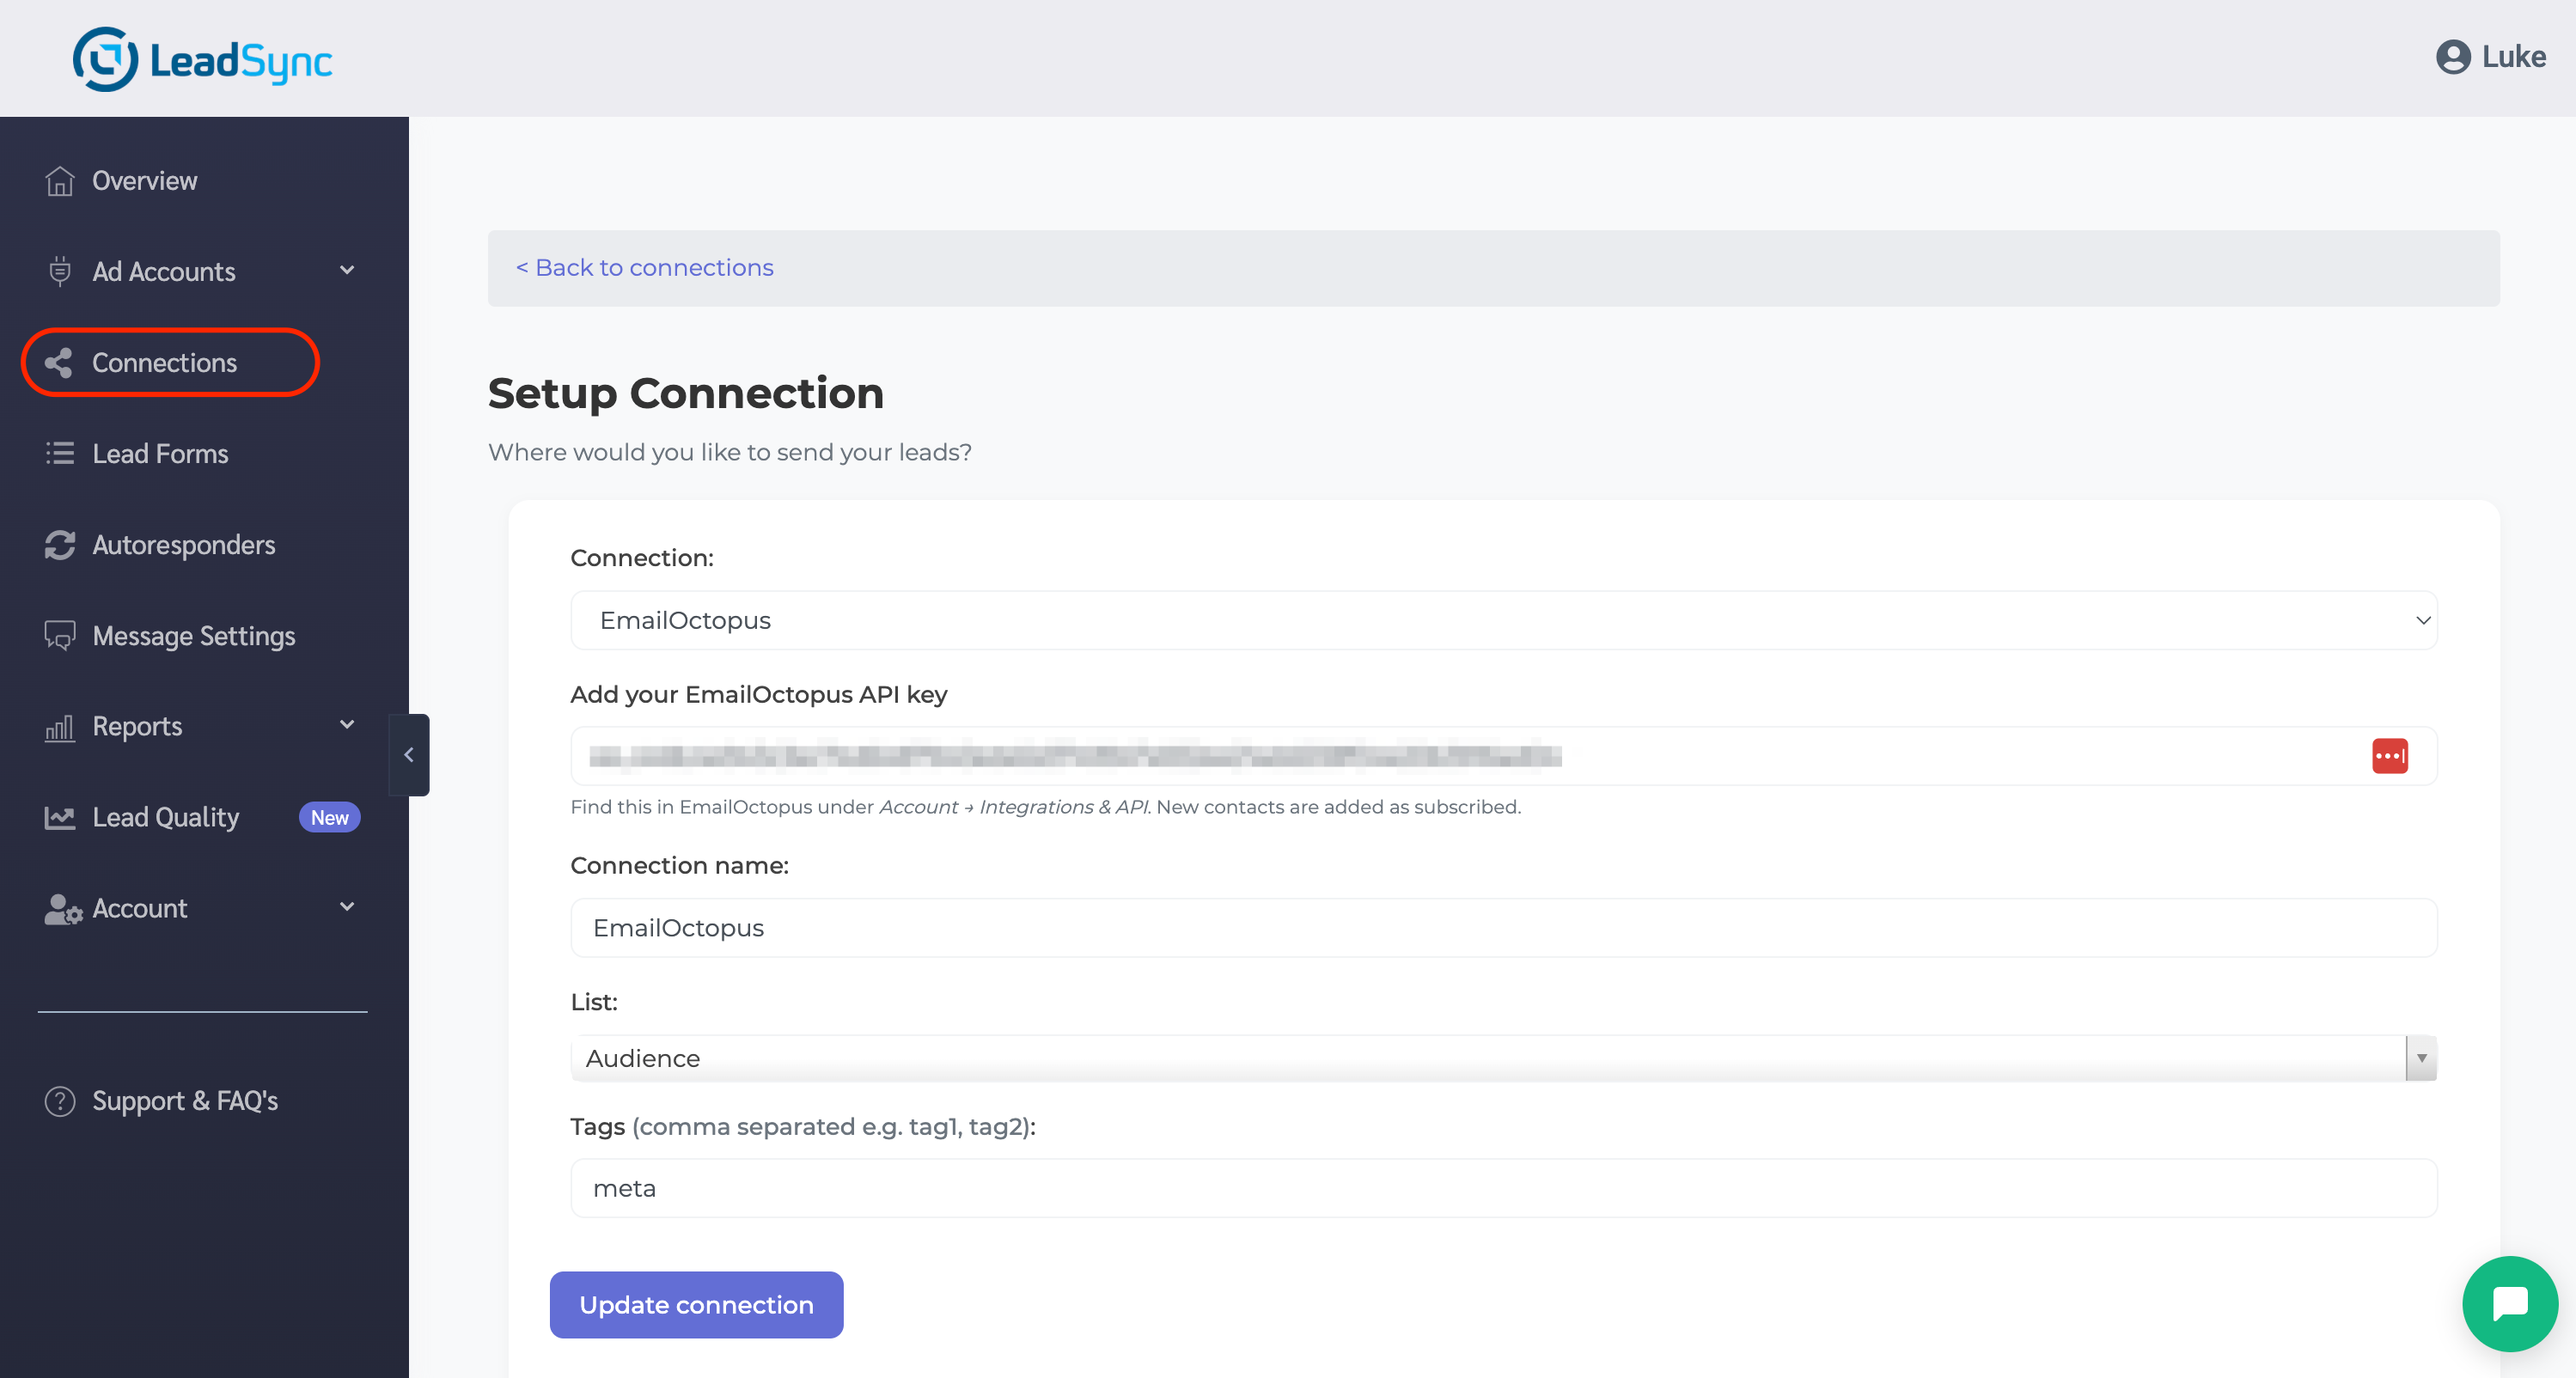
Selecting a list is required. It is the one step people skip, and without it leads have nowhere to go. New contacts are added as subscribed, since the person already opted in on your Facebook form.
Step 5: Pair a Facebook lead form to your EmailOctopus connection
- In LeadSync, go to Lead Forms → Add Facebook Lead Form.
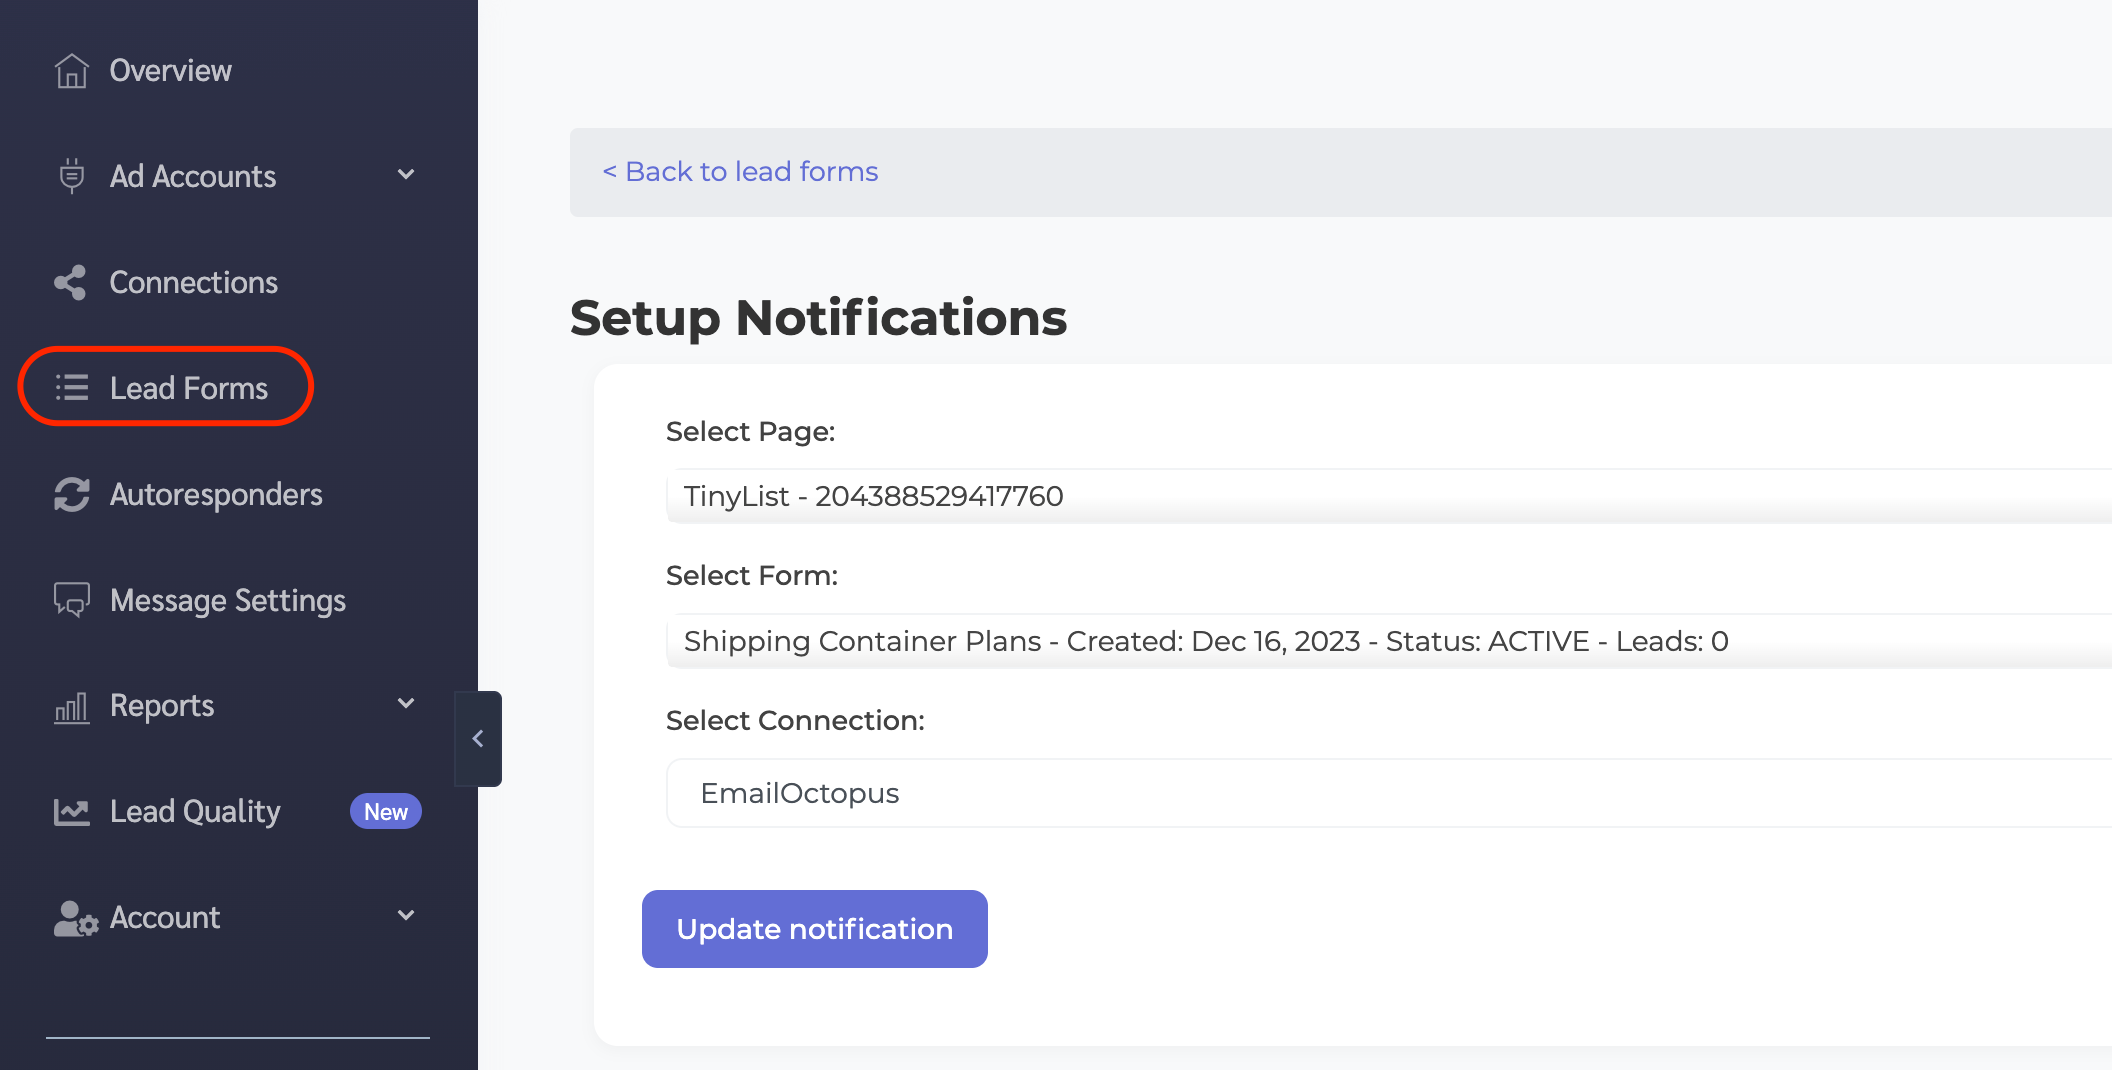
- Pick the Facebook page the leads come from.
- Pick the form you published in Step 1.
- Pick the EmailOctopus connection you just set up.
- Map each Facebook form field to an EmailOctopus field. At minimum, map email to Email. First name and last name map to FirstName and LastName. Any custom Facebook field can be mapped to an EmailOctopus field tag.
- Click Update Notifications.
If you do not map any fields, LeadSync still delivers the email address and splits the lead’s full name into FirstName and LastName automatically. Leads submitted through that Facebook form will now arrive in the chosen EmailOctopus list within seconds.
Testing your setup
Do not wait for a real lead to find out something is broken. Here is how to send a test through:
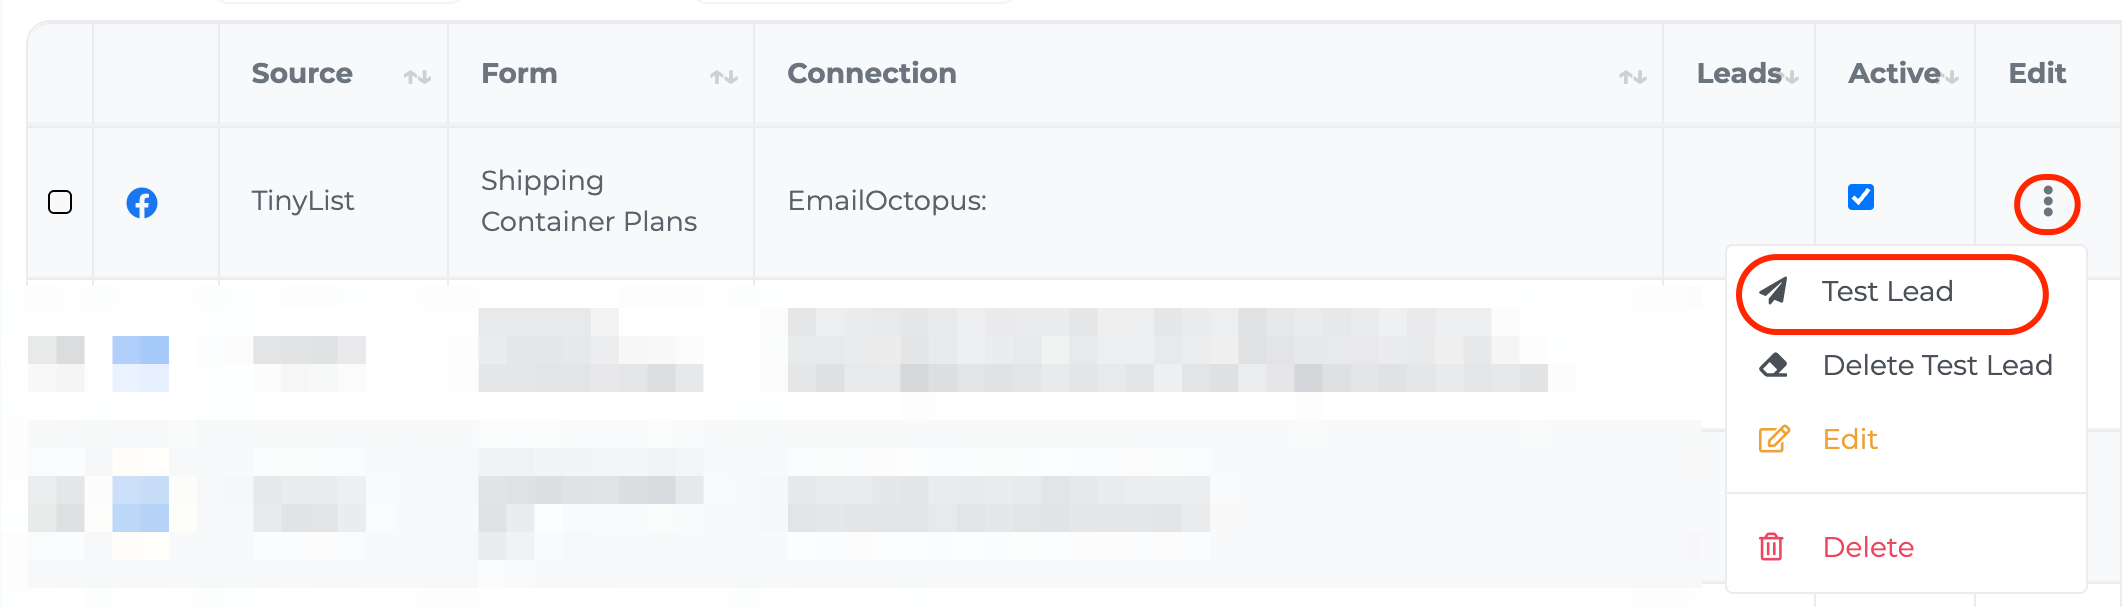
- Follow our test lead form connection guide to fire a synthetic lead through the full pipeline.
- In EmailOctopus, open your list and check Contacts. The test contact should appear with a
subscribedstatus, the fields you mapped, and any tags you configured. - If you set up an automation in Step 2, confirm it has processed the test contact.
If the test lead does not appear, the first thing to check is that a list is selected on the connection. Open Connections, edit the EmailOctopus connection, and confirm the List dropdown shows your list. A connection saved without a list is the most common cause. After that, check your user log in LeadSync under Account → Logs for an EmailOctopus Error: line.
Common questions
Does EmailOctopus have a native Facebook Lead Ads integration?
No. EmailOctopus has a handful of direct integrations, but nothing for Facebook Lead Ads specifically. You need a third-party tool like LeadSync (or Zapier, Make, Pabbly) to bridge the two.
How fast does LeadSync push Facebook leads to EmailOctopus?
Typically under 60 seconds from form submission to the contact appearing in your EmailOctopus list. LeadSync listens for Meta’s lead webhook in real time and calls the EmailOctopus contacts endpoint immediately. There is no polling delay.
Does the EmailOctopus free plan work?
Yes. This is a real advantage over tools like Flodesk that gate the API behind paid plans. EmailOctopus offers API access on every tier, including the free plan (up to 2,500 contacts), so you can connect LeadSync without upgrading.
Are new contacts added as subscribed or pending?
Subscribed. The lead already consented on your Facebook form, so LeadSync adds them as an active subscriber and any list automation fires immediately.
Can I tag the leads I sync?
Yes. Enter comma separated tags in the connection setup and every synced contact gets them. EmailOctopus creates any tag that does not already exist, so there is nothing to set up in advance.
Which Facebook lead form fields can I sync?
Any field on your Facebook form. Standard ones (email, first name, last name) map to EmailOctopus’s built-in fields. Custom questions, phone numbers, and prefilled fields map to EmailOctopus custom field tags, which you type into the mapping UI in LeadSync.
What happens if the same person submits the form twice?
EmailOctopus treats the email address as the unique identifier. A second submission updates the existing contact rather than creating a duplicate, and the contact stays on the list you chose.
Can I sync leads from multiple Facebook forms into the same EmailOctopus list?
Yes. Pair each Facebook form to the same EmailOctopus connection in Step 5. You can also split them across different lists if you want different nurture paths.
That is the whole pipeline: Facebook lead form, to LeadSync, to an EmailOctopus list, to your automation. Once the connection is live you can leave it alone, and every new lead shows up where it is supposed to, without CSVs, Zaps, or overnight delays.
If you are weighing up which email platform fits your workflow before committing, our Facebook lead ads integration guide walks through the options side by side.