
Introduction to the Facebook Lead Testing Tool
If you’ve set up a Facebook lead integrations and have found it’s not delivering leads, this guide will show you how to use the Facebook lead testing tool to help diagnose the issue. Weather you’re using LeadSync to deliver Facebook leads to email or CRM or another tool such as Zapier or Make, you may have an integration issue. In either case, the testing tool will help diagnose the issue.
In this guide, I’ll walk you through the steps to effectively use the testing tool and troubleshoot common issues.
Step-by-Step Guide to Using the Facebook Lead Ad Testing Tool
Basic Steps
Navigate to the Testing Tool: Go to Facebook’s Lead Ads Testing Tool.
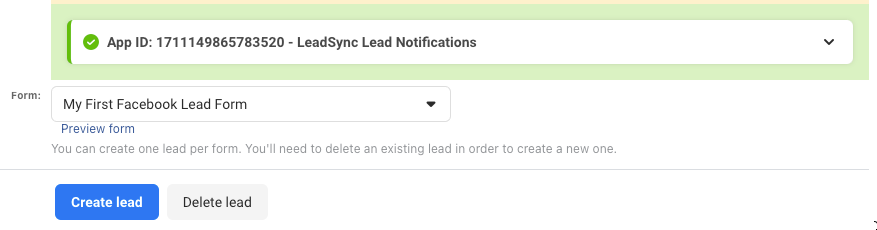
Select Your Page: Choose the relevant Facebook Page and Form from the dropdown menus. Facebook will automatically show you if you have permissions to access leads, if you have lead access manager enables and if you are a Page Admin. Under this section you’ll also be able to see which Applications have access to your leads. If you’re using LeadSync, make sure this is showing with a tick. If you’re seeing an orange warning icon, click on the arrow on the right for more details about the issue.

3. Select Your Form: From the dropdown, select the form that you want to test, making sure that this is the same form you have setup in the integration tool you’re using AND the same form you’re using in your Meta Ads.
4. Preview your Form: the best way to test your form is to use the Preview Form option. This lets you fill in the form details with real data. Some CRM’s will reject the generic data that’s submitted with

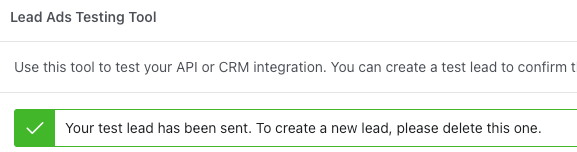
5. Create a Lead: If you don’t want to submit your own details, via the preview form option, just click the ‘Create lead’ button to proceed and test lead form data will be sent. Remember, only ‘one lead’ can be submitted per form at a time, so it’s crucial to test each form individually.

6. Test Lead Sent: You should now see “Your test lead has been sent” message.
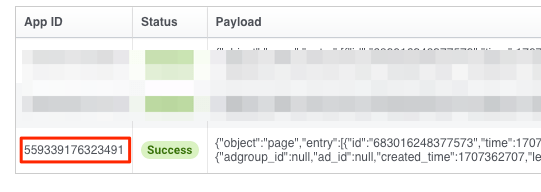
7. Track Status: After 20 few seconds or so, click on “Track Status” to see if the lead has been successfully created. If you’re using LeadSync, you should see the following success message.
The LeadSync App ID will either be 1711149865783520 or 559339176323491
8. Check your Email, CRM or APP: Make sure you’ve received the test data to the connection you’ve setup in LeadSync or Zapier.
Advanced Features
Preview Form: Before submitting, you can preview the form to customize the data being sent.
Error Handling: If you encounter a 103 error, it means CRM access has been revoked. You’ll need to reset the Facebook Leads Access CRM permissions.
Troubleshooting Common Issues
Debugging Real-Time Update Integration
If you’re facing issues with your integration with Facebook’s Webhooks, here’s how to debug:
Use the tool to create a test lead.
Check the status of the lead. If it’s pending, wait a few seconds and check again.
Once the lead is pushed to your endpoint, the status should change to “success” or “failed,” providing insights into what might be going wrong.
API Interactions
For those who prefer a more technical approach, you can create a test lead by making a POST request to /{FORM_ID}/test_leads. Make sure you meet the following requirements:
No existing test leads for the specified Lead Ad form.
A page role of Advertiser or above on the page under which the form was created.
Other Common Reasons Why You Might Not be Receiving Leads
- The lead form you’re using in your lead ad hasn’t been set up in your LeadSync Account. Please check to make sure you’ve connected the correct lead form in your LeadSync account.
- You lead notification is sitting in your spam folder.
- The email address you’re sending leads to is incorrect.
Please be sure to check these before contacting LeadSync support.
Next Steps
Once you’ve confirmed your test leads are coming through, here are some useful resources to help you get the most out of your lead ad campaigns:
- Improve your targeting: Use our complete Facebook & Meta Ads targeting guide to find the right audience for your campaigns.
- Stay compliant: Generate a free privacy policy for your lead ads — it’s required by Meta for all lead forms.
- Target high-value leads: Learn 12 ways to target high net worth individuals on Facebook & Instagram.
- Get instant lead notifications: Set up email notifications so you receive every lead in your inbox the moment it comes in.
- Connect to your CRM: See our complete integration guide for connecting your lead ads to Mailchimp, HubSpot, ActiveCampaign, and 20+ other tools.


