
If you haven’t created a Facebook (Meta) Lead ad campaign before, it may feel a little daunting. In this tutorial, I’ll walking you through how to create and run your first Facebook lead ad using the Facebook instant form add-on. You can use this method to generate leads via Facebook and Instagram.
You can make your forms smarter with branching logic — learn how to create conditional answers for lead ad forms.
How to create Facebook lead ads in 8 steps: (1) Create a new campaign with the Leads objective, (2) Build your target audience by location, demographics, and interests, (3) Upload your ad image or video, (4) Write compelling ad copy with a clear call to action, (5) Create and customize your lead form with the fields you need, (6) Add your privacy policy link and thank-you screen, (7) Publish your campaign, (8) Connect LeadSync to receive leads instantly via email, CRM, or SMS. Full step-by-step guide with screenshots below.
For the exact image and video dimensions you need, refer to our complete guide to Meta lead ad sizes and formats.
What You’ll Learn About Facebook Lead Ads
- Setting Up: Choose “Lead generation” as your campaign objective in Meta Ads Manager.
- Ad Format: Selecting the right ad format is crucial for lead generation. Facebook Lead Ads are particularly effective for this purpose.
- Advertising Budget: Establishing an advertising budget is essential. It helps in managing costs and ensures that your Facebook Lead Ads are cost-effective in acquiring quality leads.
- Audience Targeting: Define your target audience based on demographics, interests, and behaviors.
- Ad and Form Design: Craft your ad with compelling visuals and text, and customize the lead form to collect desired information.
- Lead Management: Set up a system to access and manage leads efficiently, either manually or via integration with a CRM.
- Performance Monitoring: Regularly check your campaign’s performance metrics to optimize and improve results.
I’m going to assume you already have a Facebook Business Page and/or Instagram account and Ad Account setup for your business, and we’re going to be using the Facebook Ads Quick Creation tool instead of the Guided Creation tool.
If you’re not already familiar with the Facebook Lead Ads as a format, find our more here.
Introduction to Lead Ads
Facebook Lead Ads are a powerful tool for businesses to generate high-quality leads and drive conversions. Introduced in 2015, Lead Ads have revolutionized the way companies collect leads on Facebook and Instagram. With Lead Ads, users can fill out a form directly within the Facebook platform, eliminating the need to visit an external landing page. This streamlined process increases conversion rates and reduces friction, making it easier for potential customers to provide their contact information. By using Lead Ads, businesses can collect leads at a lower cost, gather relevant information from prospects, and increase brand awareness.
Benefits of Using Lead Ads
The benefits of using Lead Ads are numerous. Firstly, Lead Ads allow businesses to reach a massive and high-converting audience, with over 3.05 billion monthly active users on Facebook. Lead Ads are optimized for mobile users, making it easy to reach people who are likely to interact with your brand. Additionally, Lead Ads reduce conversion friction, facilitating precise targeting and increasing conversions. With Lead Ads, businesses can also save time and money by automating the lead generation process and reducing the need for external landing pages. Furthermore, Lead Ads provide a fully customizable tool, allowing businesses to promote their products or services to a specific group of users while boosting brand awareness.
Step 1: Create a Meta Lead Ad Campaign
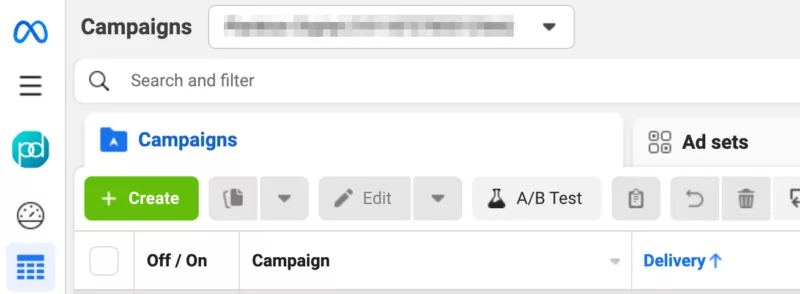
Log in to your Facebook Ads Manager account.
From your Facebook Ads Manager account, click on the Create button.
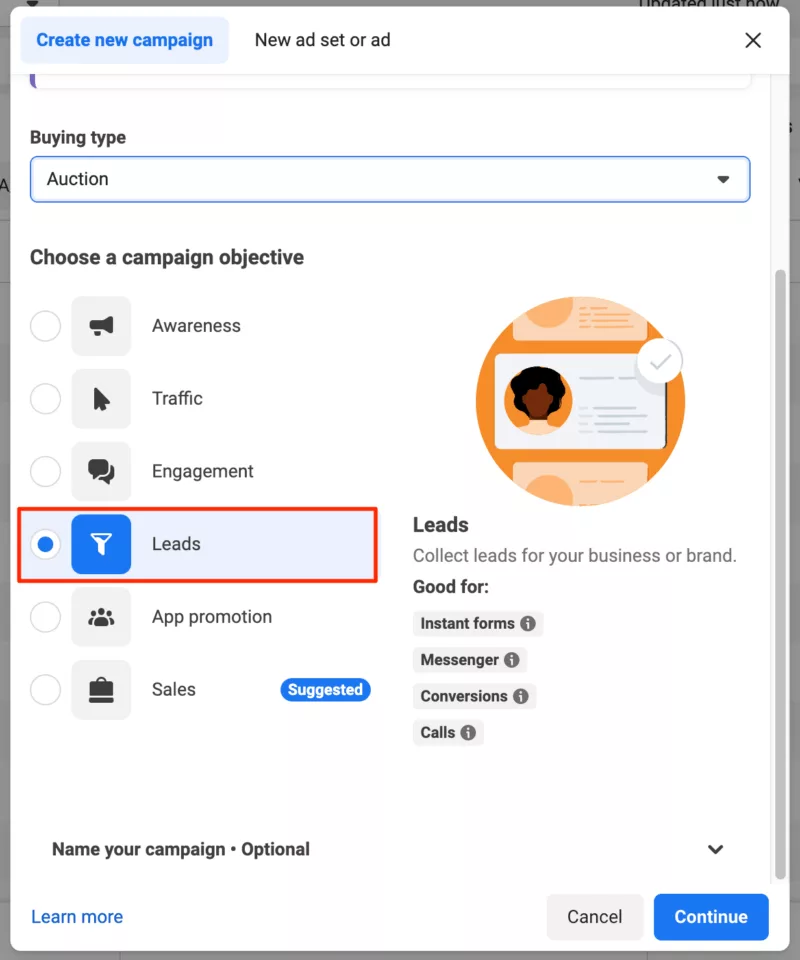
Choose Leads as your campaign objective.
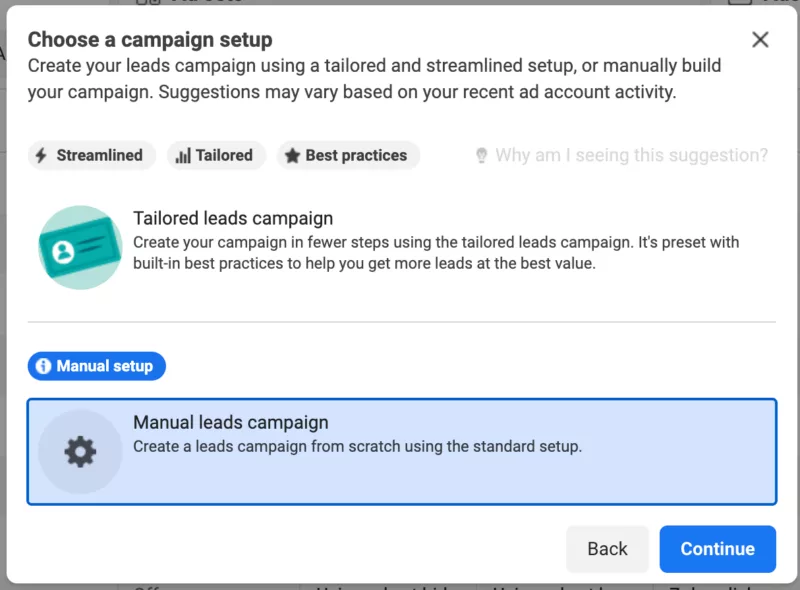
Select Manual leads campaign as the setup option.
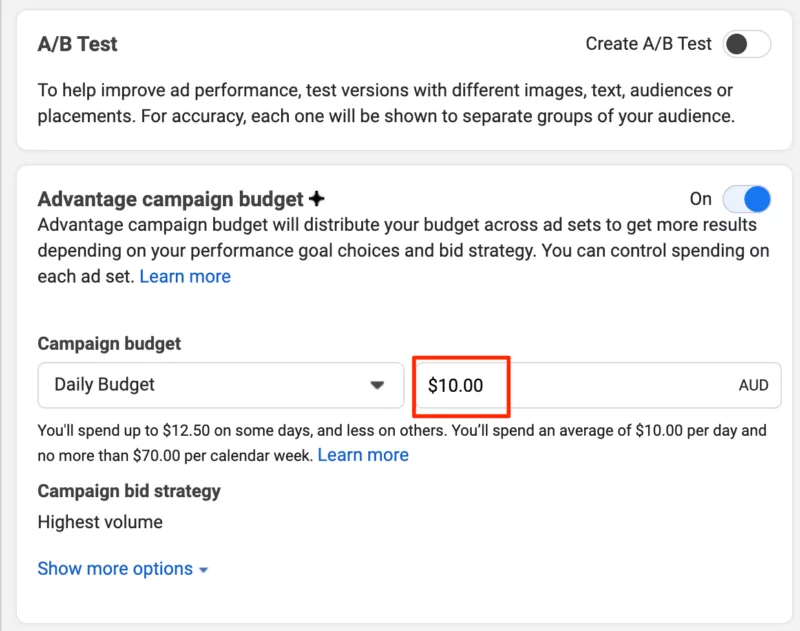
Name your campaign and set your budget.
When determining your ad spend, consider how it will affect the reach and effectiveness of your campaign. A higher ad spend can significantly enhance your campaign’s visibility and its ability to generate leads, especially for events with traditionally low attendance rates. I recommend starting with a minimum of $5 – $10 per day. However, if your budget allows, increasing your ad spend can accelerate the results and improve the overall performance of your lead generation efforts.
Click Next to move to the next section.
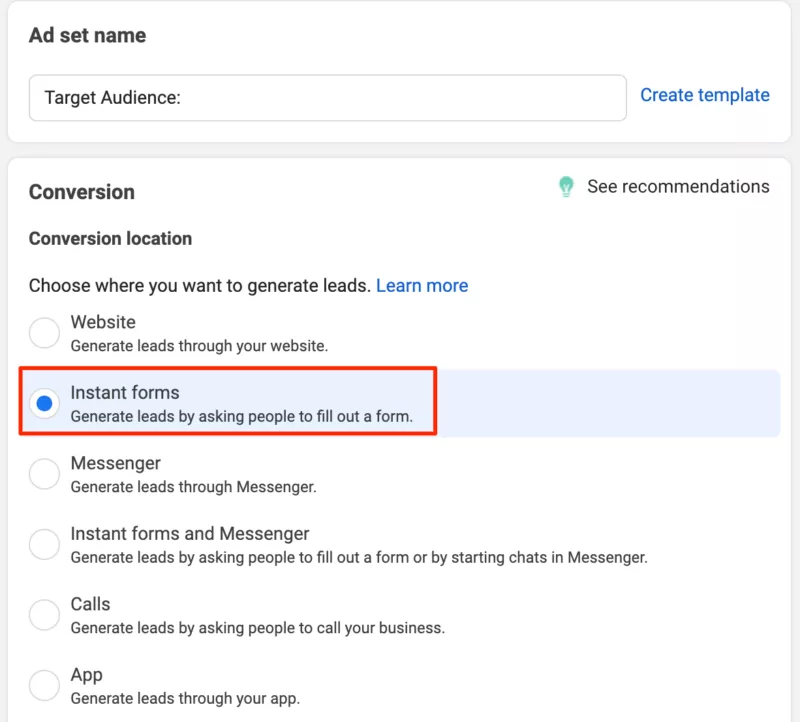
Name your ad set. The Ad Set is where you will choose the audience you want to target, so you may want to use a name that reflects this. Utilizing custom audiences can help you target specific groups, such as existing customers or lookalike segments, which can reduce customer acquisition costs and improve campaign efficiency.
Choose Instant Forms as your conversion location
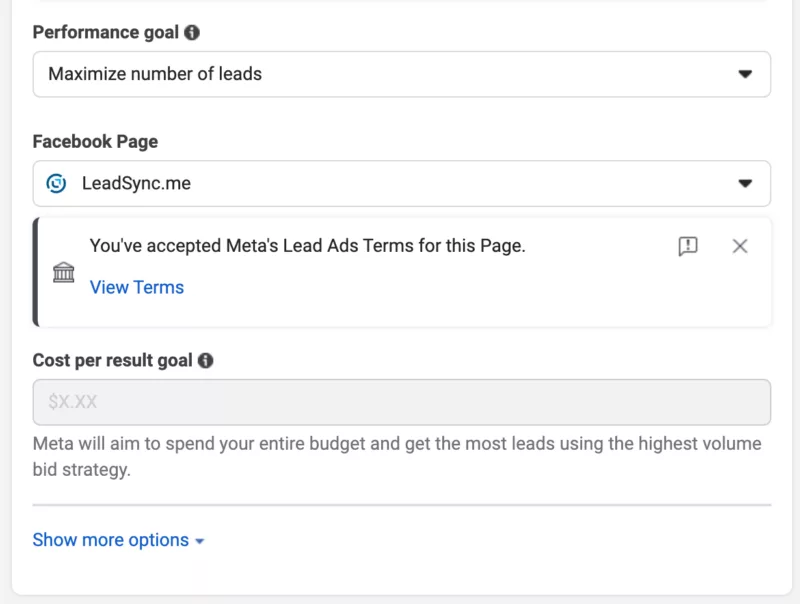
Leave Performance goal set to Maximize number of leads, and make sure your Facebook page is selected.
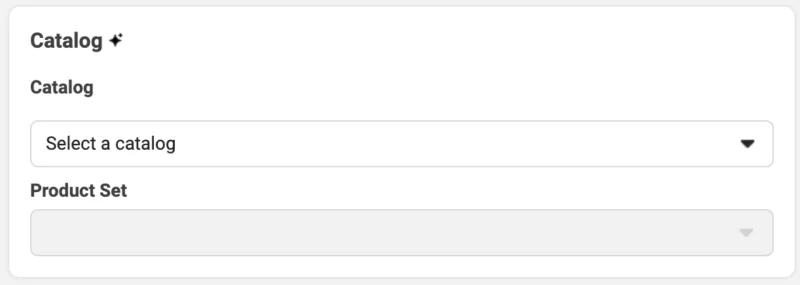
Leave the Catalog section empty:
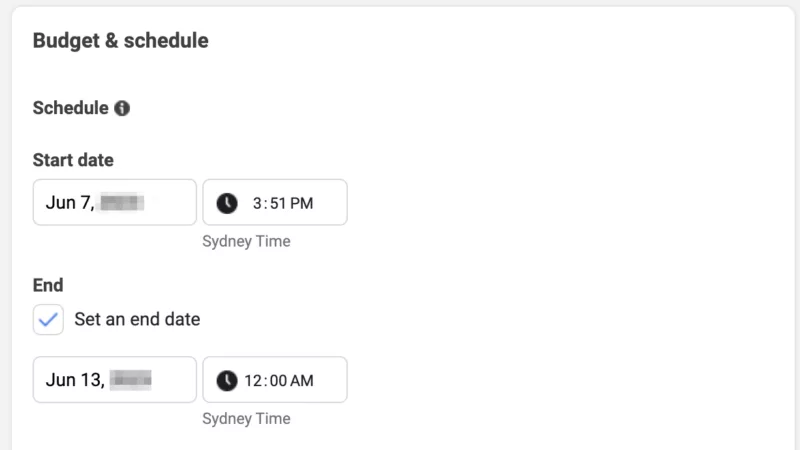
Budget & Schedule: you might like to set a hard end date if you don’t want to spend more than a certain amount. For example, you could set the end date for 1 week away in case you forget to turn the campaign off.
Step 2: Build Your Target Audience
Now it’s time to build your target audience – the people you want to show your Facebook lead ads to. Targeting your current customers when building your audience can lead to more accurate targeting and the development of ideal customer profiles, enhancing the effectiveness of your marketing strategies.
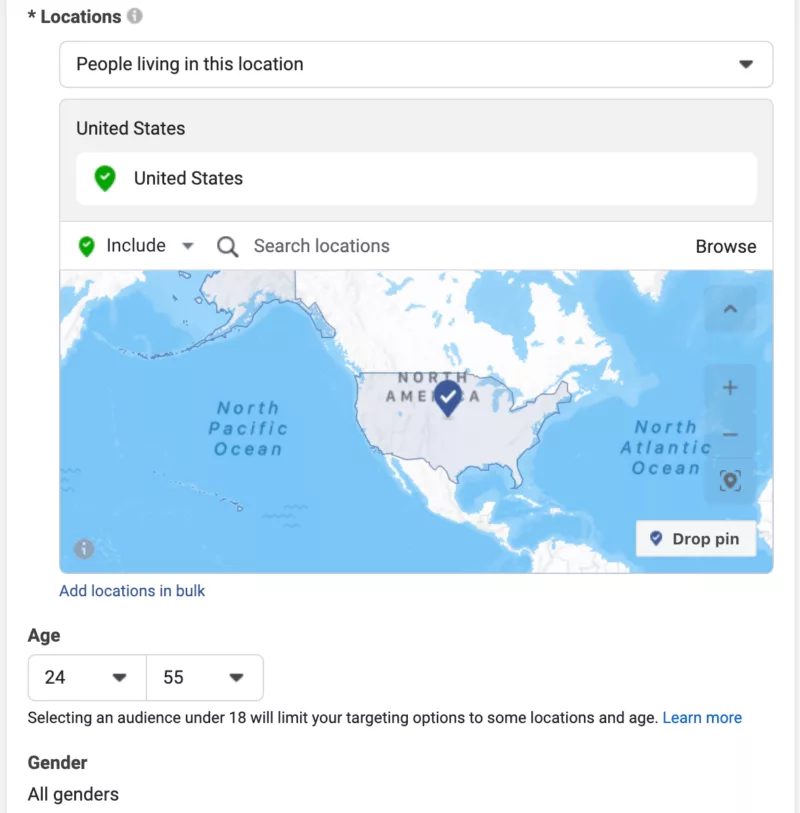
- Select the location you want your ads to run in. This might be by country, or even postcode
- Gender
- Age Range
- Detailed targeting: checkout our facebook ads targeting guide here. Creating lookalike audiences based on your current customers can help you reach new potential customers with similar interests and demographics, leading to higher conversion rates and better marketing effectiveness.
Click Next
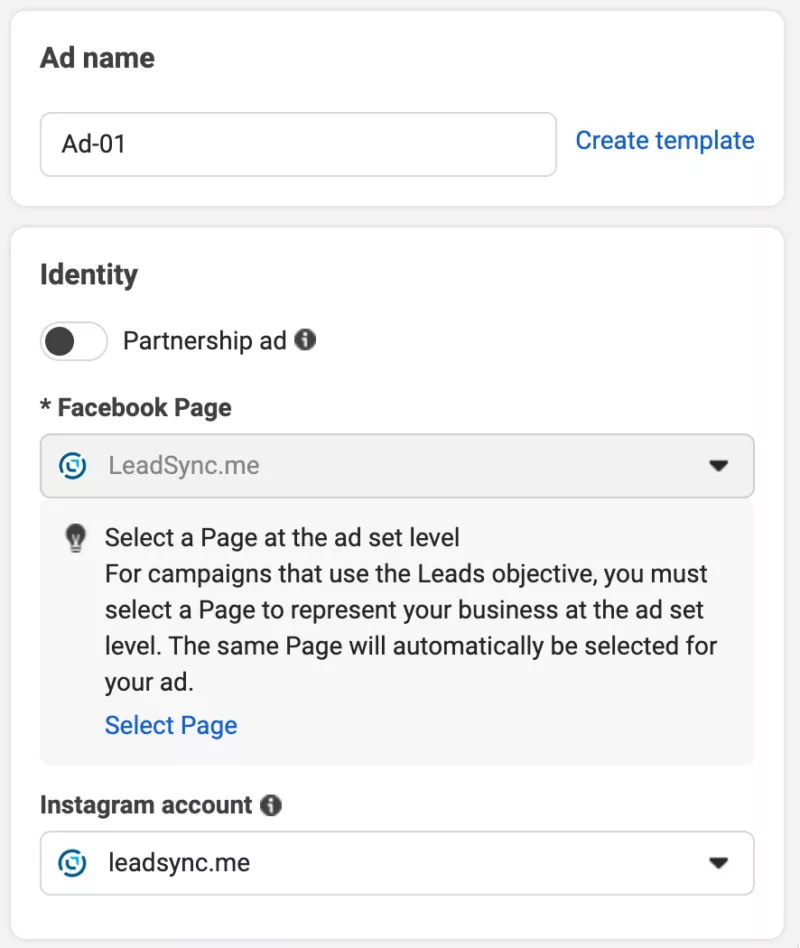
Add an Ad Name. I tend to use a simple naming convention here, such as “Ad 01”. Again, make sure your Facebook Page is selected and also set your Instagram account if you have added it to your Ads Manager account, otherwise, just use your Facebook page.
Optimizing Facebook lead ads for mobile users is essential, considering the significant number of users accessing Facebook on mobile devices.
Tips for Building Your Target Audience
Start building your target audience by selecting a geographic region. This could be a whole country, such as the “United States”, or it could be a more targeted local location. In this example I’m targeting “People living in this location” and San Francisco, California, with a 25 mile radius selected.
Identifying the right audience is crucial for ensuring your ad campaign aligns with your advertising objectives.
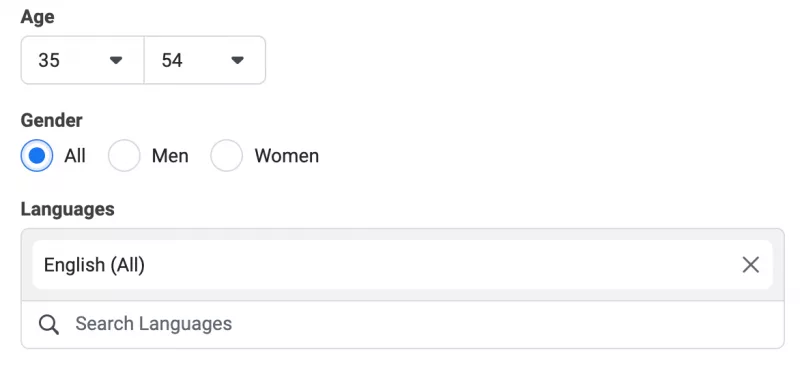
Narrow your target audience by age, gender. Primary language is optional.
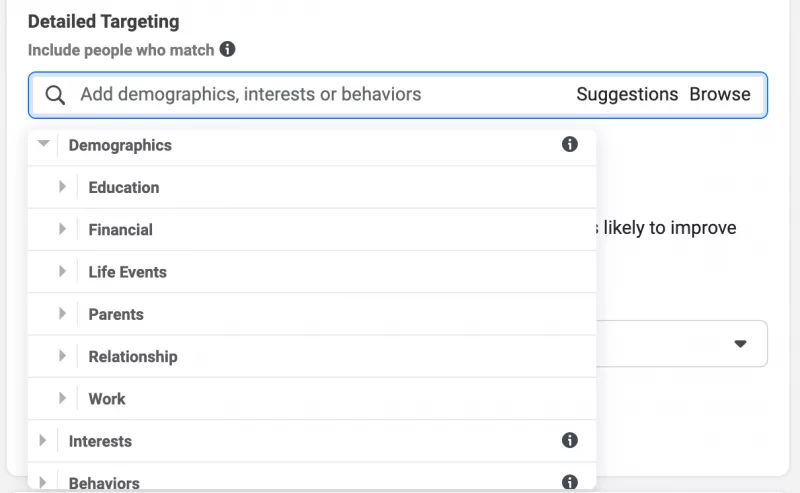
You can define your target audience based on Demographics, Interests and Behaviours. There are 100’s of options in the Detailed Targeting section, so I suggest you take a look around at the options to try to find your ideal target audience. This targeting map will show you ~all~ most of the options available.
Step 3: Creating your ad

If you need some inspiration for ad copy and images, check out our post on How to Spy on Your Competitors’ Facebook Ads. Looking at successful ad examples can provide valuable insights into crafting effective Facebook lead ads that resonate with your target audience.
Click on the Ad Name to start creating your Ad. Make sure the correct Facebook Page is selected. If you have an Instagram account connected to your Business Manager account, you will be able to select it here. Otherwise, your Lead Ads will show up on Instagram as a sponsored ad on behalf of your Page, which is fine when you’re getting started.
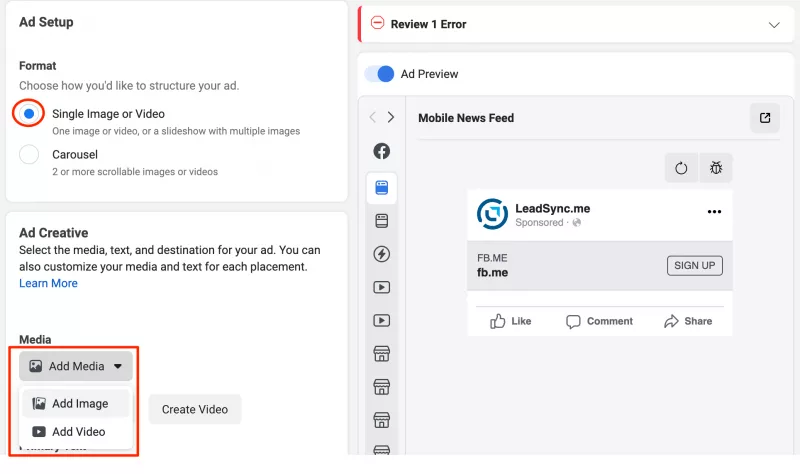
Ad Setup: Here’s where you’ll need to have either a static image or a short video (under 15 seconds). Using a square or 1:1 ratio image or video will save you creating multiple formats for placements in Facebook & Instagram. This step is crucial in Facebook advertising, as it directly impacts your ability to engage and capture the interest of your target audience. Additionally, consider using carousel ads to present multiple offers, which can enhance your lead generation strategies by showcasing various incentives.
If you have a little bit of creative flare, then I recommend Canva for creating static Facebook ads for yourself. You can start with one of their square Instagram templates.
If you’d prefer a graphic design professional’s help, then I highly recommend 99designs.
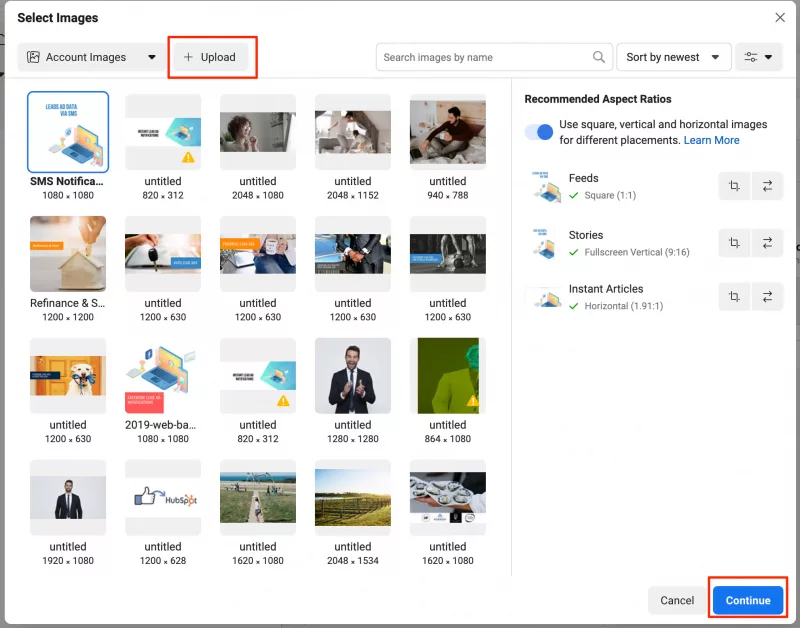
Upload your image: Assuming you’ve created a single image, click on the Add Image button then the Upload button. Find the image on your computer and upload it. Click Continue once it’s uploaded. Using a single image can be beneficial for creating visually appealing ads that meet your campaign’s goals.
Step 4: Write your ad copy
There have been volumes written on ad copy, so I won’t go too much into what makes good Facebook Lead ad copy.
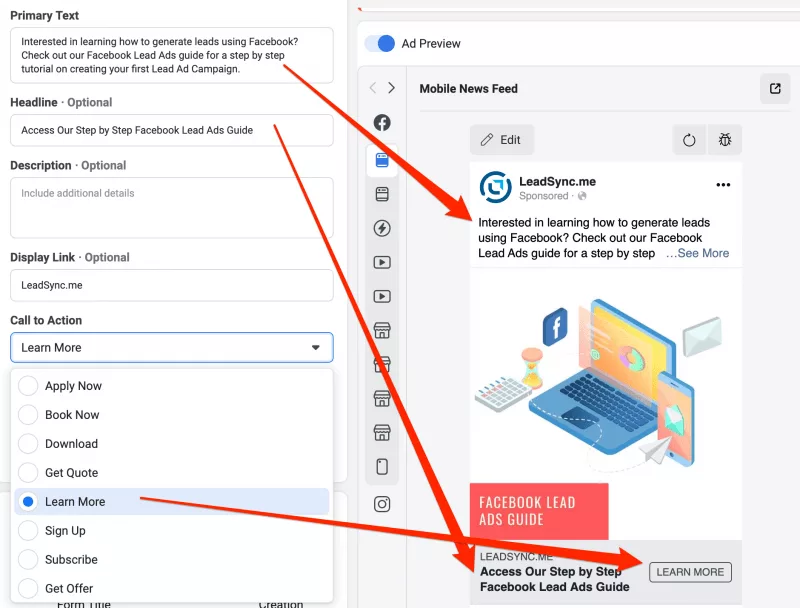
Fill in your Primary Text, Headline and choose your Call to Action.
Use an appropriate call to action. As you can see in the image above, there are a number of options to choose from. In this Lead Ad example, I’m going to ask people for their Name and Email address before sending them to this very blog post. Yep, it can be as simple as that.
Engaging ad copy can significantly help in increasing brand awareness, especially when paired with content formats like short videos that align with your messaging goals.
If you’re struggling with writing ad copy, then you might try one of the many AI tools such as ChatGPT to help inspire you.
Step 5: Create your Lead Form
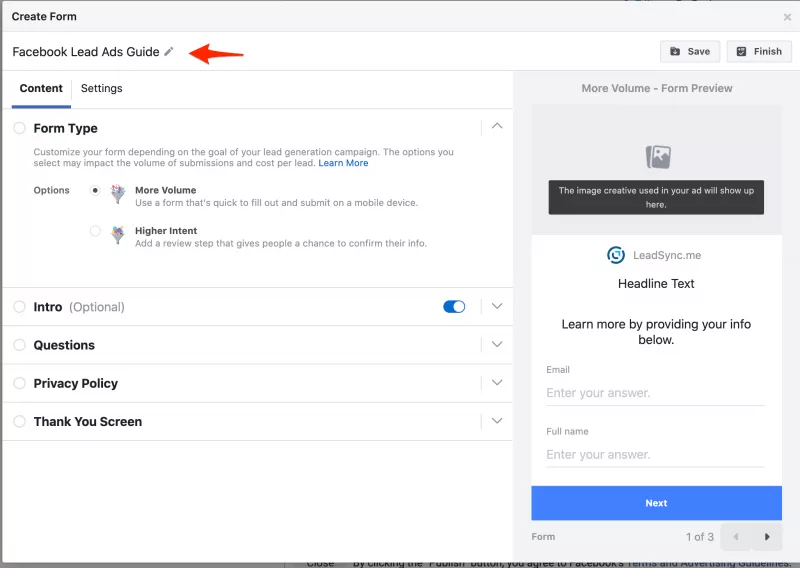
Time to create your lead form. This is the form people will see when they click on your ad. To get started, click the Create Lead Form button in the Instant Form section and name your form. This will make it easier to find later when you start creating multiple campaigns and forms.
Leave the More Volume default form type selected.
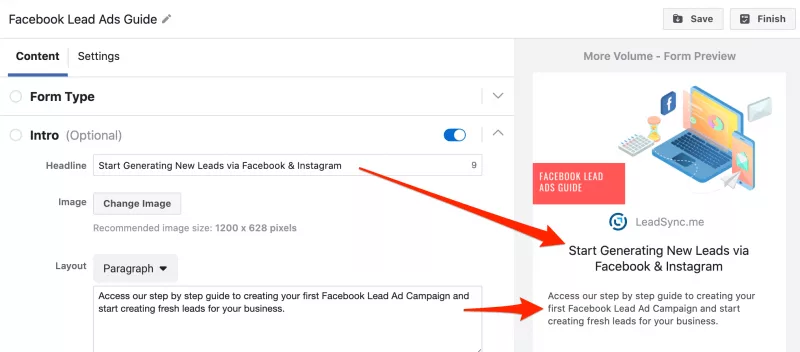
Fill in the Intro: Add a Headline and an introductory paragraph to reiterate what people should expect after they submit the form. By default, your form will use the image from your ad as the header image, but you can customise this image.
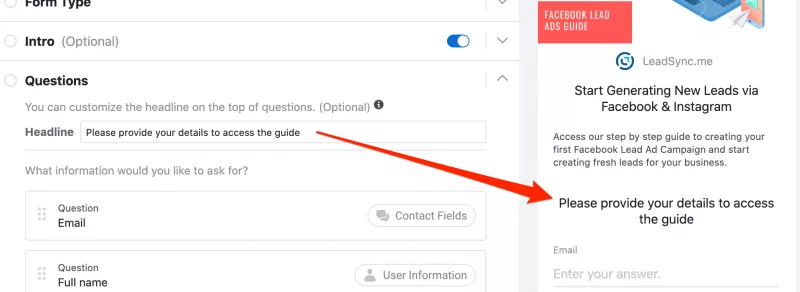
Add a headline that will appear above the form fields.
Customise your form questions: By default, your form will ask for the person’s full name and email address, but there are a heap more questions you can ask to better qualify your leads as you can see in the image above. Customizing the questions on your lead forms is crucial for capturing the necessary information to qualify new leads effectively. This customization can significantly impact the number of generated leads by simplifying the submission process and ensuring that the information gathered is directly relevant to your offerings. You can include custom questions tailored to your business needs, such as multiple choice questions, which can make the form more engaging and easier to complete.
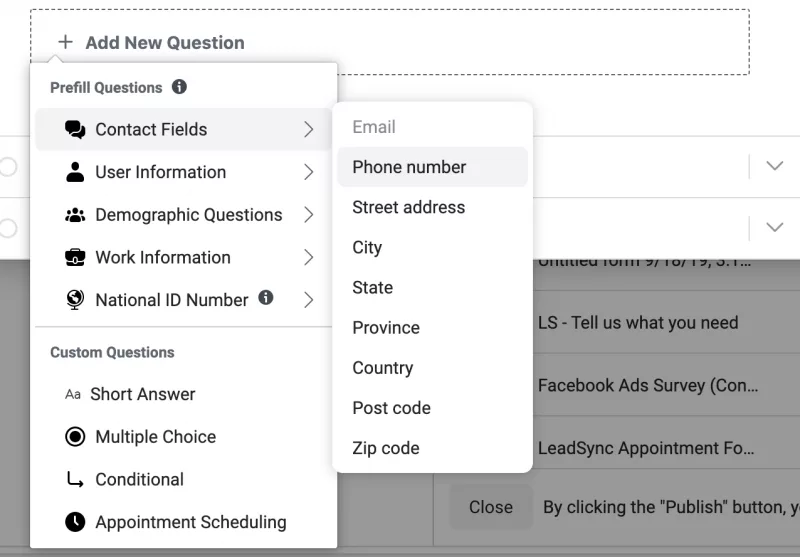
Here’s a list of all the pre-filled fields you can use in your lead form. Using pre-populated fields can streamline the process by automatically filling in user data from their Facebook profiles, enhancing user experience and improving conversion rates.
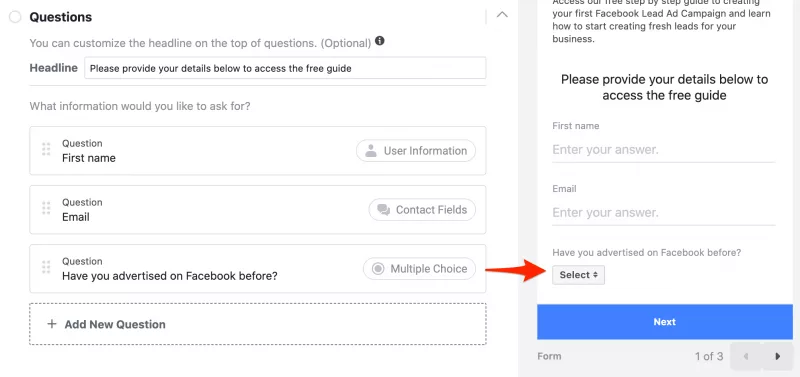
In the above example, I’ve asked for the person’s first name, email address, and a response to a simple Yes/No question.
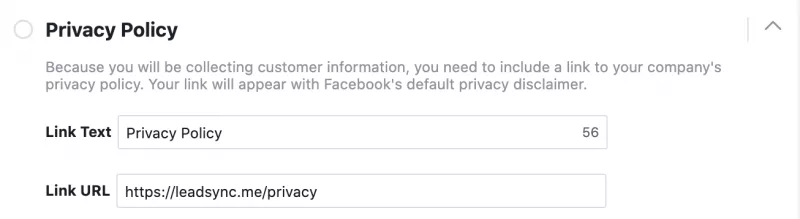
Link to your Privacy Policy: hopefully you have a privacy policy on your website. Add a link to it here. If you don’t use our Facebook privacy policy generator to create your own without the need for a website.
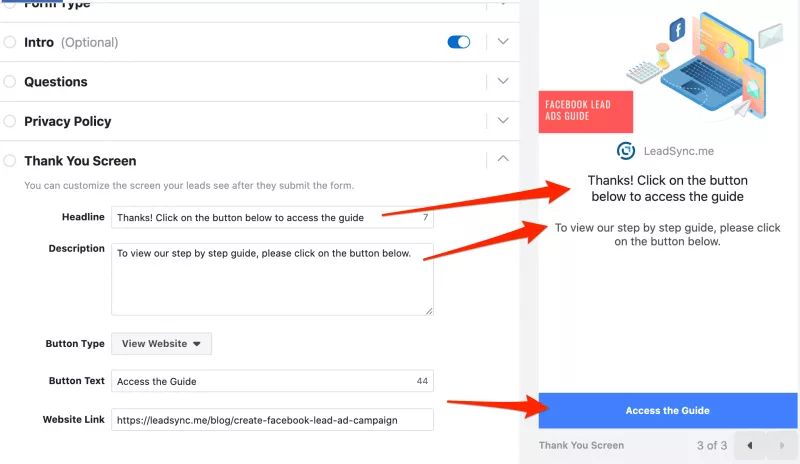
Customize your Thank You screen: this is what people will see after they’ve submitted their details. This could be as simple as “Thanks for sending us your details, we’ll be in touch shortly”, or as in this example, I’m asking people to click on the link to view the content.
Click the Finish Button to finish editing your form.
If you want more qualified leads and less volume, then check out how to use the Higher Intent Lead form option.
Step 6: Publish
Click the Publish button at the bottom right of the screen to publish your Lead Ads campaign. 💥
Step 7: Accessing your leads
There are two ways to access your leads:
- Download your leads from Facebook: this method requires you having to login to Facebook and download your leads manually. Here’s how.
- Connect a 3rd Party App: that’s where we come in 😉. Create a LeadSync account to receive instant Facebook lead ad email notifications or to connect your CRM, email marketing platform or even SMS notifications.
Additionally, you can download your leads as a CSV file, which enhances data management efficiency. This allows you to easily sync generated leads with your CRM, supporting marketers in following up effectively and increasing conversion rates.
By efficiently managing these leads, your sales team can significantly improve their follow-up and deal-closing processes, leveraging real-time data to track and nurture leads through the sales funnel, enhancing response times to customer queries, and utilizing CRM nurturing sequences to engage potential customers effectively.
Step 8: Monitor your cost per lead
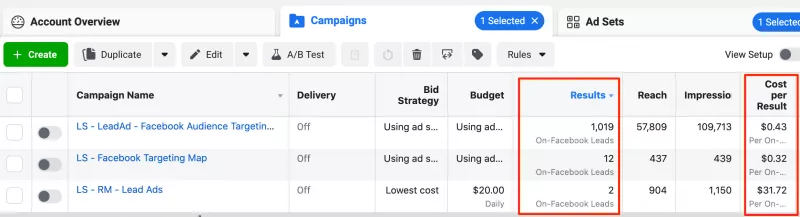
Make sure you regularly check on the performance of your campaign by viewing your Facebook ads manager reports. You want to keep an eye on your Cost Per Result which is your cost per lead generated.
Monitoring your advertising budget can help optimize your campaign’s cost per lead, ensuring you get the most out of your investment.
Congratulations! You’ve launched your first Facebook Lead Ad campaign. 🥳
Common Mistakes to Avoid
When using Lead Ads, there are several common mistakes to avoid. One of the most significant mistakes is not optimizing ads for mobile users. With 98.5% of Facebook users accessing the platform through mobile devices, it’s crucial to ensure that Lead Ads are mobile-friendly. Another mistake is not using relevant and high-quality images in ad creatives. High-quality images can significantly increase the effectiveness of Lead Ads, while low-quality images can deter potential customers. Additionally, businesses should avoid using too many fields in their Lead Forms, as this can decrease completion rates. It’s also essential to test and optimize Lead Ads regularly to ensure maximum ROI.
Integrating with CRM
Integrating Lead Ads with a Customer Relationship Management (CRM) system is crucial for maximizing the effectiveness of lead generation campaigns. By integrating Lead Ads with a CRM, businesses can automatically sync leads, access lead data in real-time, and deliver personalized follow-up responses. This integration enables businesses to track leads through the sales funnel, nurture them accordingly, and increase conversion rates. With LeadSync, you can connect your Lead Ads to 30+ CRM systems, email platforms, and SMS — with leads delivered in under 60 seconds. No coding required.
Lead Ads vs Conversion Ads: Which Should You Use?
One of the most common questions advertisers face is whether to use Lead Ads (with instant forms) or Conversion Ads (that send people to a landing page). Here’s how they compare:
| Lead Ads (Instant Forms) | Conversion Ads (Landing Page) | |
|---|---|---|
| User experience | Form opens inside Facebook — no page load | User leaves Facebook to visit your website |
| Conversion rate | Higher (2-5x) due to pre-filled fields and less friction | Lower — each page load step loses ~20% of users |
| Lead quality | Can be lower (people submit accidentally). Use Higher Intent forms to improve. | Generally higher — more deliberate action required |
| Cost per lead | Typically 30-50% cheaper | Higher, but often better quality |
| Landing page needed? | No — form is native to Facebook | Yes — you need a fast, mobile-optimized page |
| Best for | Volume-focused campaigns, mobile audiences, simple offers | High-value offers, complex products, retargeting |
Our recommendation: Start with Lead Ads. They’re cheaper to test, faster to set up (no landing page needed), and convert better on mobile. If lead quality is an issue, switch to Meta’s Higher Intent form type before moving to conversion ads.
How Much Do Facebook Lead Ads Cost?
Facebook lead ad costs vary widely by industry, location, and targeting. Here are average cost-per-lead (CPL) benchmarks to help you set realistic expectations:
| Industry | Average CPL | Conversion Rate |
|---|---|---|
| Real Estate | $15 – $35 | 6 – 9% |
| Home Services | $20 – $45 | 7 – 10% |
| Automotive | $25 – $50 | 5 – 7% |
| Education | $15 – $30 | 8 – 12% |
| Health & Fitness | $30 – $55 | 6 – 8% |
| Dental | $50 – $80 | 8 – 10% |
| Insurance | $30 – $60 | 5 – 8% |
| E-commerce | $10 – $25 | 9 – 12% |
| B2B / SaaS | $35 – $75 | 4 – 7% |
Key factors that affect your CPL:
- Audience size: Narrow audiences cost more per lead but convert better
- Number of form fields: Every additional field increases CPL by 5-10%. Keep it to 3-4 fields to start.
- Ad creative quality: Video ads typically produce 20-30% lower CPL than static images
- Time of year: Q4 (Oct-Dec) CPLs are 20-40% higher due to holiday ad competition
- Geographic targeting: US/UK/AU leads cost 2-3x more than emerging markets
We recommend starting with a $10-20/day budget for at least 5-7 days to give Meta’s algorithm enough data to optimize delivery.
What Happens After the Lead Comes In? Quality & Follow-Up
Creating the ad is only half the battle. What you do after someone submits your lead form determines whether they become a customer or ghost you. Here’s what the data shows:
- Speed matters most: Leads contacted within 5 minutes are 9x more likely to convert than those contacted after 30 minutes (Harvard Business Review).
- The 1-hour cliff: After 1 hour, lead-to-customer conversion rates drop by 80%. After 24 hours, most leads have forgotten they submitted the form.
- Most businesses are too slow: The average response time for online leads is 47 hours. That’s a massive competitive advantage if you respond faster.
How to follow up instantly:
- Set up instant email notifications with LeadSync so your sales team knows the moment a lead comes in (delivered in under 60 seconds).
- Enable autoresponders to automatically send the lead a confirmation email with next steps, a PDF, or a link to book a call.
- Connect your CRM so leads are automatically added to your pipeline and assigned to the right rep.
- Add SMS notifications for high-priority forms so your team can call back within minutes.
The businesses that win with lead ads aren’t the ones with the best targeting — they’re the ones who respond fastest.
Troubleshooting Facebook Lead Ads
Running into issues? Here are the most common Facebook Lead Ads problems and how to fix them:
Lead form not showing on your ad
- Make sure you selected “Instant Forms” as the conversion location (not “Website” or “Calls”)
- Confirm the form is attached to your ad — check the Ad level in Ads Manager
- Ensure the form is published, not still in draft
Not receiving leads / leads not syncing
- Check your Page permissions — you need Admin access to receive leads
- Your Facebook access token may have expired — reconnect your account in your integration tool
- Use Facebook’s Lead Ads Testing Tool to send a test lead and verify your connection
Low lead quality / junk submissions
- Switch your form type from “More Volume” to “Higher Intent” — this adds a review step before submission
- Add a custom question that requires typing (not just tapping pre-filled fields)
- Narrow your audience targeting — broad audiences attract more unqualified clicks
- Consider using Meta’s Conversion Leads optimization, which trains the algorithm on leads that actually convert
Ad rejected or form won’t publish
- Make sure your privacy policy URL is valid and accessible
- Check that your ad doesn’t violate Meta’s advertising policies (common issues: before/after images, health claims, personal attributes)
- If your form was previously disapproved, create a new form rather than editing the old one
Privacy & Compliance (GDPR, CCPA)
If you’re collecting leads from users in the EU, UK, or California, you need to comply with data privacy regulations. Here’s what to know:
- Privacy policy is mandatory: Facebook requires a privacy policy link on every lead form. If you don’t have one, use our free Facebook privacy policy generator.
- Custom disclaimer: For GDPR compliance, add a custom disclaimer to your lead form explaining how you’ll use their data and getting explicit consent. Go to your form settings and enable the “Custom Disclaimer” option.
- Data retention: Facebook stores lead data for 90 days. After that, it’s deleted. Make sure you’re syncing leads to your CRM or email platform in real-time so you don’t lose data.
- Right to deletion: Under GDPR, users can request that you delete their data. Have a process in place to handle these requests.
- CCPA opt-out: California residents have the right to opt out of data sales. If you’re running lead ads targeting California, include appropriate disclosures.
For most businesses, the key steps are: (1) add a privacy policy to your form, (2) enable the custom disclaimer for EU audiences, and (3) sync leads in real-time so nothing is lost when Facebook deletes them after 90 days.
Frequently Asked Questions
How much do Facebook lead ads cost?
The average cost per lead ranges from $10-$80 depending on your industry, targeting, and ad quality. E-commerce and education tend to be cheapest ($10-$30), while dental and B2B can run $50-$80 per lead. Start with a $10-$20/day budget and optimize from there.
Can I edit a lead form after publishing?
No. Once a lead form is published, it cannot be edited. You’ll need to create a new form and attach it to your ad. This is why it’s important to preview and test your form thoroughly before publishing.
Do Facebook lead ads work for B2B?
Yes, but with caveats. B2B lead ads typically have higher CPLs ($35-$75) and require tighter targeting. Use job title and industry targeting, add qualifying custom questions (company size, budget), and consider LinkedIn Lead Gen Forms as an alternative if your audience is primarily on LinkedIn.
What’s the minimum budget for Facebook lead ads?
Technically, you can start with as little as $1/day. However, we recommend a minimum of $10-$20/day to give Meta’s algorithm enough data to optimize. Running less than $5/day often results in poor delivery and unreliable data.
Can I use lead ads for Instagram too?
Yes. When you create a Facebook Lead Ad campaign, your ads automatically run on both Facebook and Instagram (unless you manually exclude placements). The lead form experience is the same on both platforms.
How do I improve lead quality from Facebook lead ads?
Three proven methods: (1) Switch from “More Volume” to “Higher Intent” form type, which adds a review screen before submission. (2) Add custom qualifying questions that require the user to type an answer. (3) Use Meta’s Conversion Leads optimization to train the algorithm on leads that actually convert into customers.
How quickly will I receive leads after someone submits?
If you’re downloading leads manually from Facebook, there can be delays of hours or even days. With LeadSync, leads are delivered to your email, CRM, or SMS in under 60 seconds — making it possible to follow up while the lead is still warm.
What happens to leads after 90 days?
Facebook automatically deletes lead data after 90 days. If you haven’t downloaded or synced your leads before then, they’re gone permanently. This is why it’s critical to connect a tool like LeadSync to automatically sync leads to your CRM or email platform in real-time.
More Resources
For the most up-to-date resources on creating lead ads using the instant form add-on, check out Facebook’s instant form add-on faq.


